Setting Up Your Rented Epson Printers With PheedLoop
We are pleased to introduce Epson badge printing to PheedLoop OnSite. This new feature offers professional, full-color badge printing on demand for your events. Eliminating the multi-week wait time for badges, this system prints all badges directly from the printer, thereby mitigating many complications associated with traditional pre-printing.
Epson printers print badges on attendee check-in, offering new benefits like flexible design changes without production deadline worries.
Contents
- 1. Getting Started
- 2. Setting up your Epson printers and iPads
- 3. Feeding badges into Epson printers
- 4. Connecting Epson printers to PheedLoop OnSite
- 5. Troubleshooting
- 6. Frequently Asked Questions
- 7. Getting Help
- 8. Ready to Print!
1. Getting Started
Before you begin printing, let’s make sure you have everything you need.
1.1 Software Requirements
Please note that Epson Printing is currently only available on PheedLoop OnSite. Other alternatives, such as the Event Dashboard, will not be available.
Hardware
In addition to the Epson printer and cables, kiosks come with the following:
- One router kit (per 4 printers), which includes:
- One TP-Link AX1500 Archer Wi-Fi 6 Router
- Ethernet Cables for each printer
- One power cable for the router
- Two iPads
- Two iPad Stands
- Two USB-C <> Lightning chargers for the iPads
If you are missing one or more of these items, please contact logistics@pheedloop.com for assistance.
1.2 Network Requirements
Both the iPads (wireless) and Epson printers (wired) must be on the same network for badge printing to function. This is a key requirement and likely the culprit behind any issues with the Epson refusing to print.
Important: Please ensure the iPads and Epson printers are on the same network. The iPads will not be able to connect to the Epsons if this step is not taken.
1.3 Operational Considerations
Epson printers utilize ink cartridges for printing, unlike Zebra thermal-based printers. Each Epson kiosk comes with a BNIB pack of CMYK ink (4 total cartridges) and a Maintenance Box that must be installed manually at the venue. The Epson printer will not work until both the Maintenance Box and ink cartridges are inserted. For instructions, please refer to 2.1 Inserting the Maintenance Box and Ink Cartridge into the Epson.
Expect the ink cartridges to provide an average yield of 500 prints on a design with 25% colour coverage on the badge, as noted in the sales contract. If you have purchased additional ink cartridges, those will also be included in the kiosks.
As an example, if an event has 500 people and 2 Epson printers, they will receive 8 ink cartridges and 2 Maintenance Boxes. If you have purchased 1 additional CMYK pack and Maintenance Box, this total will come to 12 ink cartridges and 3 Maintenance Boxes.
We recommend regularly monitoring the ink levels on printers to prevent service interruptions during events.
1.4 Your Badge Design is ready for use
The Epson Badge Design should be added to the Badge Label Designer, like in the screenshot below.

This process should already be completed ahead of the Epsons being delivered. If you cannot find your badge design under OnSite > Badges & Printers > Badge Label Designer, please contact logistics@pheedloop.com for assistance. Written instructions on how to add a badge design to the Badge Label Designer are available here.
2. Setting up your Epson printers and iPads
This section will cover setting up your Epson printers and iPads. For this document, we will assume you have a general idea of where your Epson printers will be located at your venue.
Each Epson Kiosk comes with the following components
- 1 Epson CW4000U printer
- 1 Epson CW4000U Power Adaptor (42V DC)
- 1 Epson CW4000U Wi-Fi Dongle
- 4 Epson CW4000U Ink Cartridges (Cyan, Magenta, Yellow, Black)
- 1 Epson CW4000U Maintenance Box
In addition, one router kit is provided for every 4 Epson Kiosks. Each Router Kit comes with the following components:
- 1 TP-Link WiFi router
- 1 power cable for the router
- A custom number of Ethernet cables based on order size (number of Epson printers +1)
If you are missing one or more of these items, please contact logistics@pheedloop.com for assistance.
2.1 Inserting the Maintenance Box and Ink Cartridge into the Epson
When your Epson arrives, both the Maintenance Box and Ink Cartridge are stored separately from the printer. This is to ensure that no damage occurs during shipping. In order for the printer to function, both items must be inserted into the Epson for the printer to operate.
2.2 Inserting the Maintenance Box into the Epson printer
The Maintenance Box captures discarded ink and is integral for operating smoothly throughout your event. If the Maintenance Box is not inserted, the printer will not run. The Maintenance Box will arrive in your venue with a clearly marked box:

Open the package to find your Maintenance Box.

Standing in front of the Epson printer, pull the access panel on the very left of the Epson printer. The cover will be taken out, revealing a space where you can insert the Maintenance Box.

When inserting the Maintenance Box into the Epson printer, please ensure that the aluminum foil faces outward from the printer and that the chip is oriented upward, as depicted in the image below. The Epson unit is engineered to reject improper insertion, mitigating any concerns regarding incorrect placement.

Once done, close the cover, and you can proceed to the next step.
2.3 Inserting Ink Cartridges into the Epson printer
The Ink Cartridges are what the Epsons use to print your badges. Your Ink Cartridges will arrive in individual boxes. Take the Ink Cartridges out of the box to begin inserting them into the Epsons.

To access the ink cartridges, gently pull the compartment below the touchpad. The ink compartment should open immediately.

Please ensure that the ink cartridges are inserted in the order shown in the photo below and as outlined on the machine itself. Simply push the cartridge into the slot, and you will hear a click confirming that it is inserted properly. The ink level should automatically adjust in the Epson and be displayed.

If you ever need to take the cartridges out, push the latch to the right of the ink cartridge inwards, and the cartridge will be released with a click sound.
2.4 Connecting your Epsons and iPads to the Router
Connecting your Epsons to the internet is one of the most important parts of completing your Epson setup. Once you turn on the router, plug the Ethernet line ordered from the venue to the router. Regardless of the connection, the Wi-Fi network for the iPads will always be displayed as “PheedLoop Print” and the network password is shared privately. The iPads should automatically connect to the PheedLoop Print Wi-Fi network.

Both the Epson and the iPads must be connected to the same network in order to facilitate badge printing; there is no workaround to this.
2.5 Connecting the Epsons to the Router
Before connecting the Ethernet cables to the router, ensure the router is powered on by plugging in its power adapter and verifying the lights are on.
It is critical to connect the correct Ethernet cable to the correct port, as shown in the image below. Each router kit includes one blue Ethernet port (typically labeled WAN) and four orange Ethernet ports (LAN ports).

- Connect the Ethernet cable from the venue's internet source (e.g., modem) to the blue Ethernet port. The setup will not work if this is connected incorrectly.
- Connect the Ethernet cables from the Epson devices to any of the remaining orange Ethernet ports. There is no preference on which port to use.
2.6 Connecting iPads to the Router
The iPads can connect to the router just like any other network. Simply navigate to your device's Wi-Fi and connect to the aforementioned network.
2.7 Connecting Epsons to the internet via the Wi-Fi Dongle
Please note that it is strongly recommended to use the Router instead of the Wi-Fi Dongle. The router is far less likely to present issues compared to the dongle and provides a more stable connection.
Epson printers are also capable of connecting to the internet through a special Wi-Fi dongle. If you are using this connection method, it is recommended that printers be situated no more than 25 feet from the router to ensure optimal printing performance.
The Epson printer should now refresh and display Network Connection Verified. If this does not appear, verify the ethernet connection is properly configured and/or the wifi is within effective range.
Similar to connecting the router, ensure the Ethernet cable or Wi-Fi dongle is plugged into the back of the Epson printer before turning it on. If this is not done, you will not see the Wi-Fi menu. If you have not plugged this in already, simply restart the printer to establish a connection.

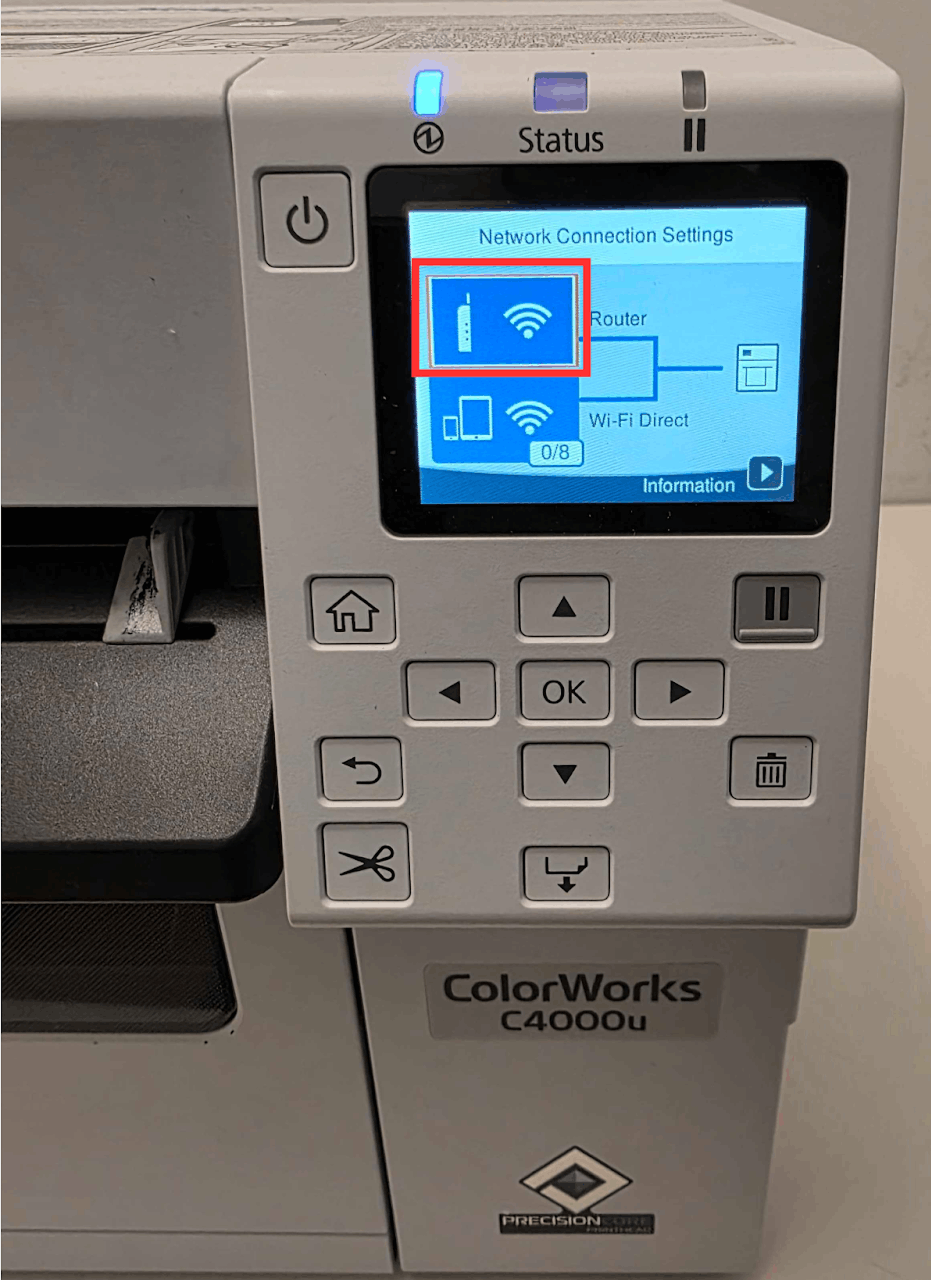
Once you see the Wi-Fi option as shown in the image above, follow the steps to establish an internet connection:
- Plug the Wi-Fi dongle into the Epson and turn on the printer
- Using the touch screen, navigate to the Wifi portion
- If you do not see the setting like in the screenshot below, ensure the dongle is plugged in and reset the Epson.
-
Select Router
-
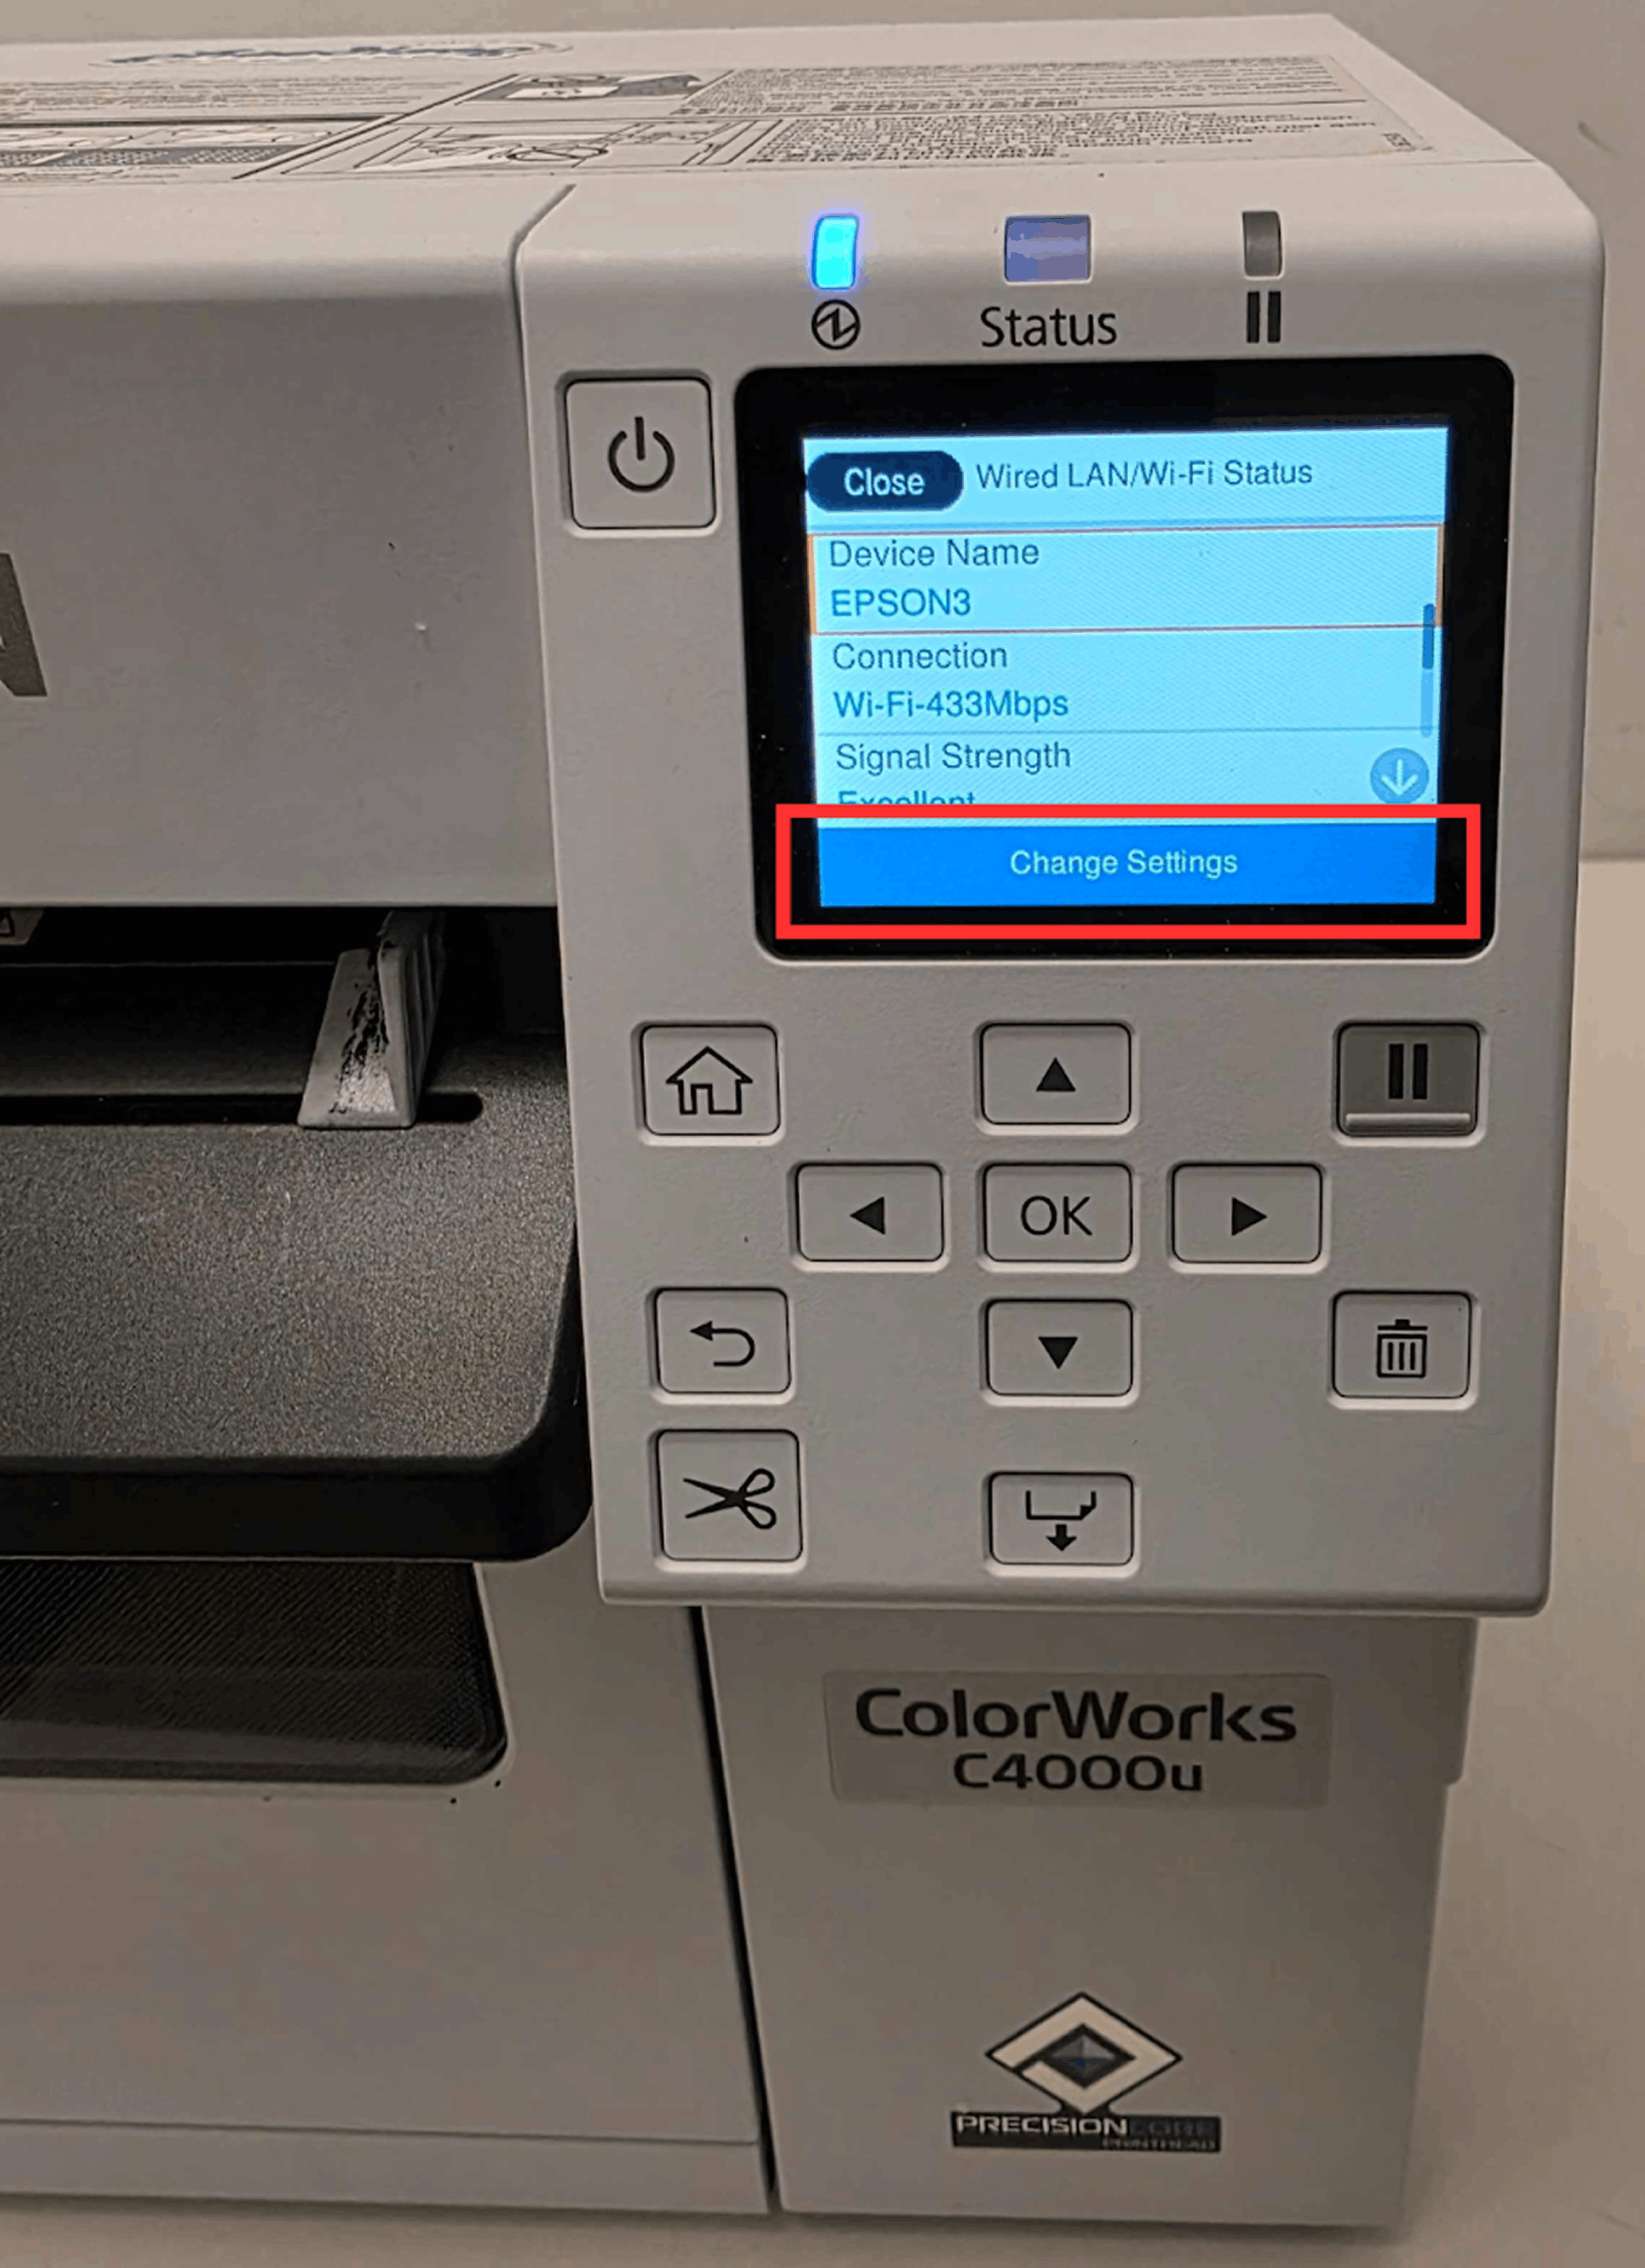
Scroll down and select Change Settings
-
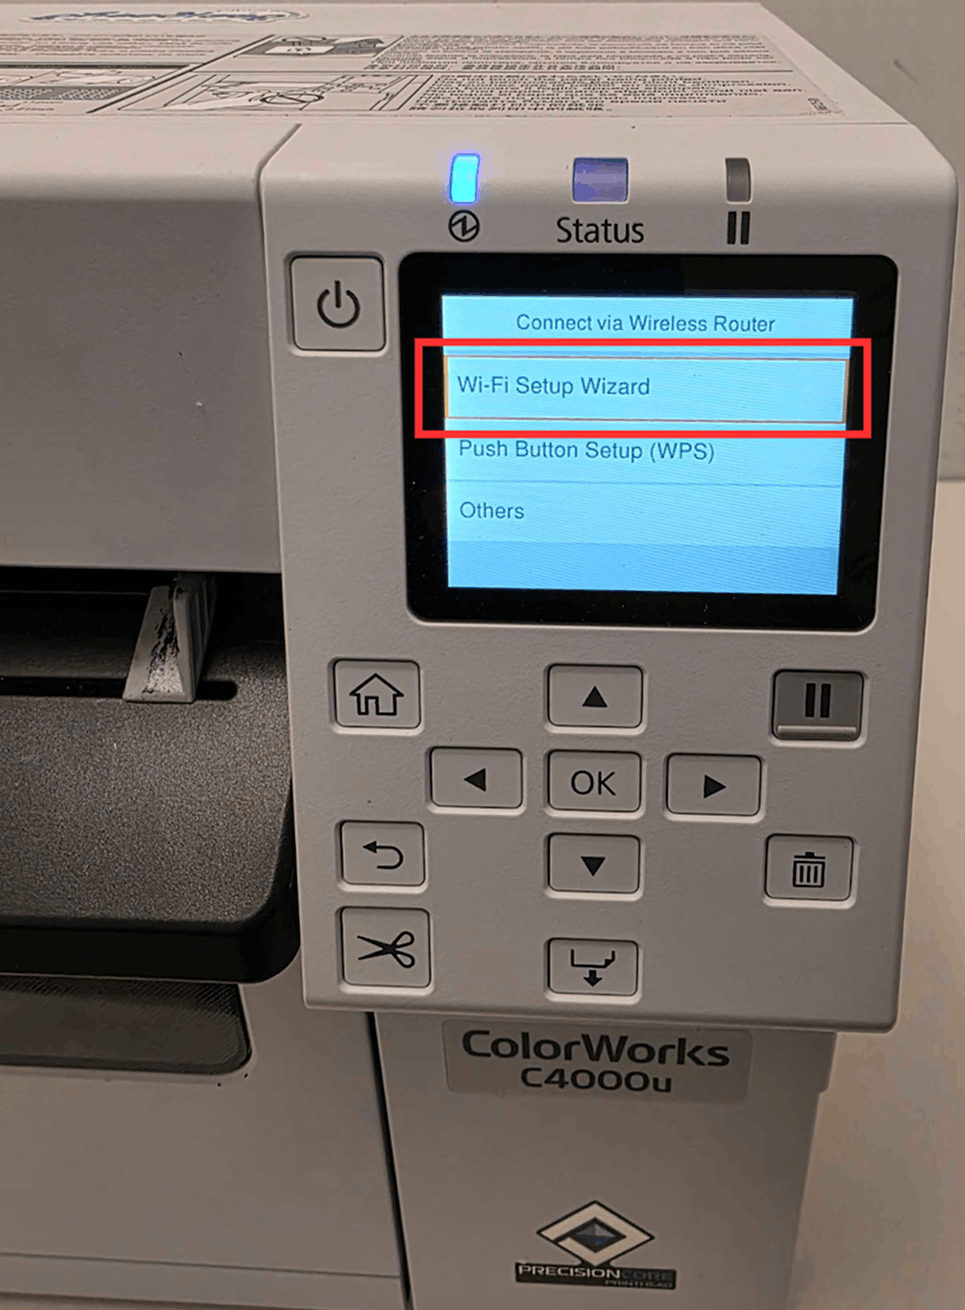
Select Wi-Fi Setup Wizard
-
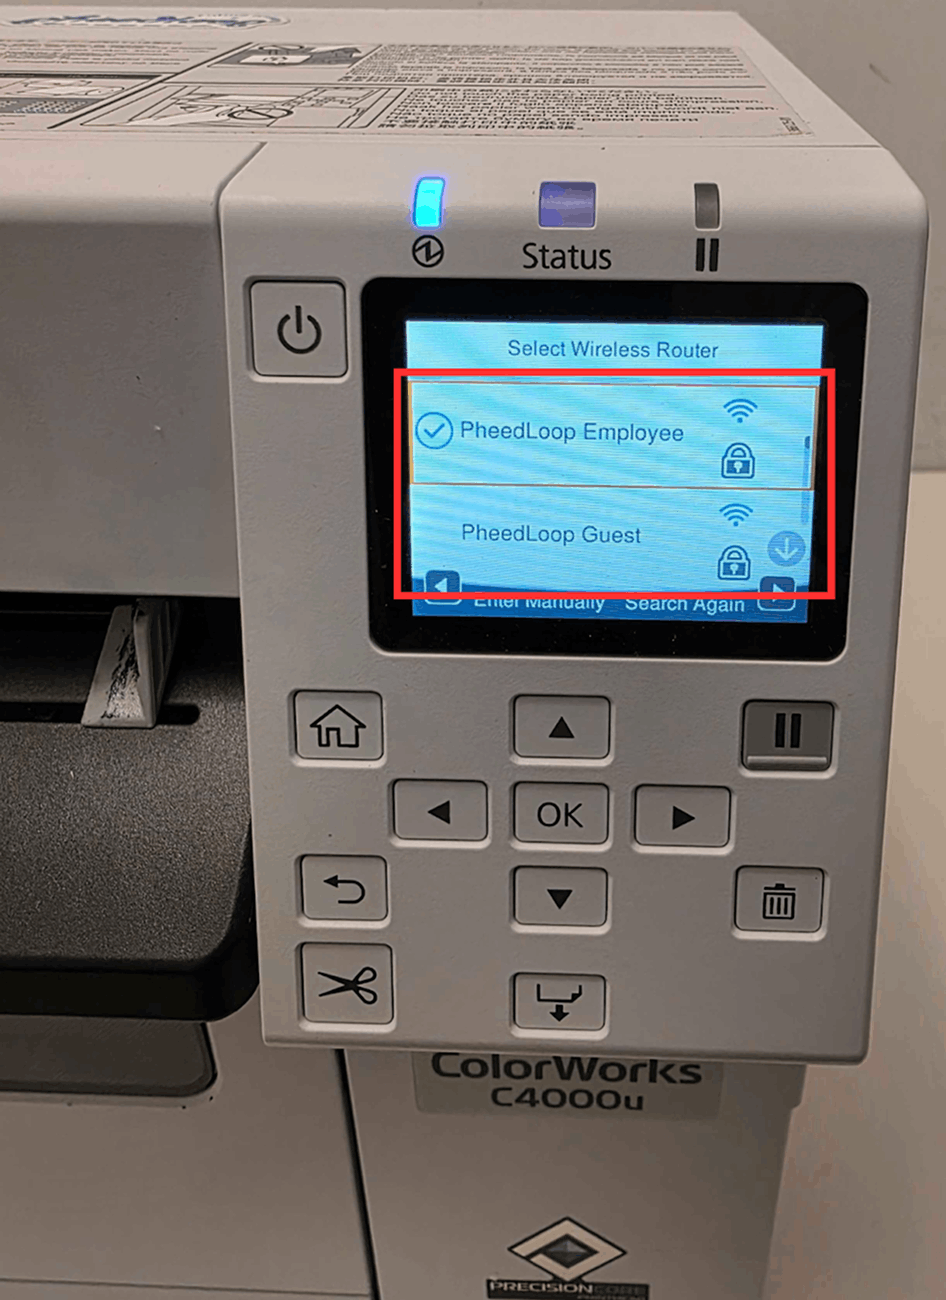
Find the Wi-Fi you wish to connect to
-
Press OK, and under the Enter Password field, enter the password to your Wi-Fi
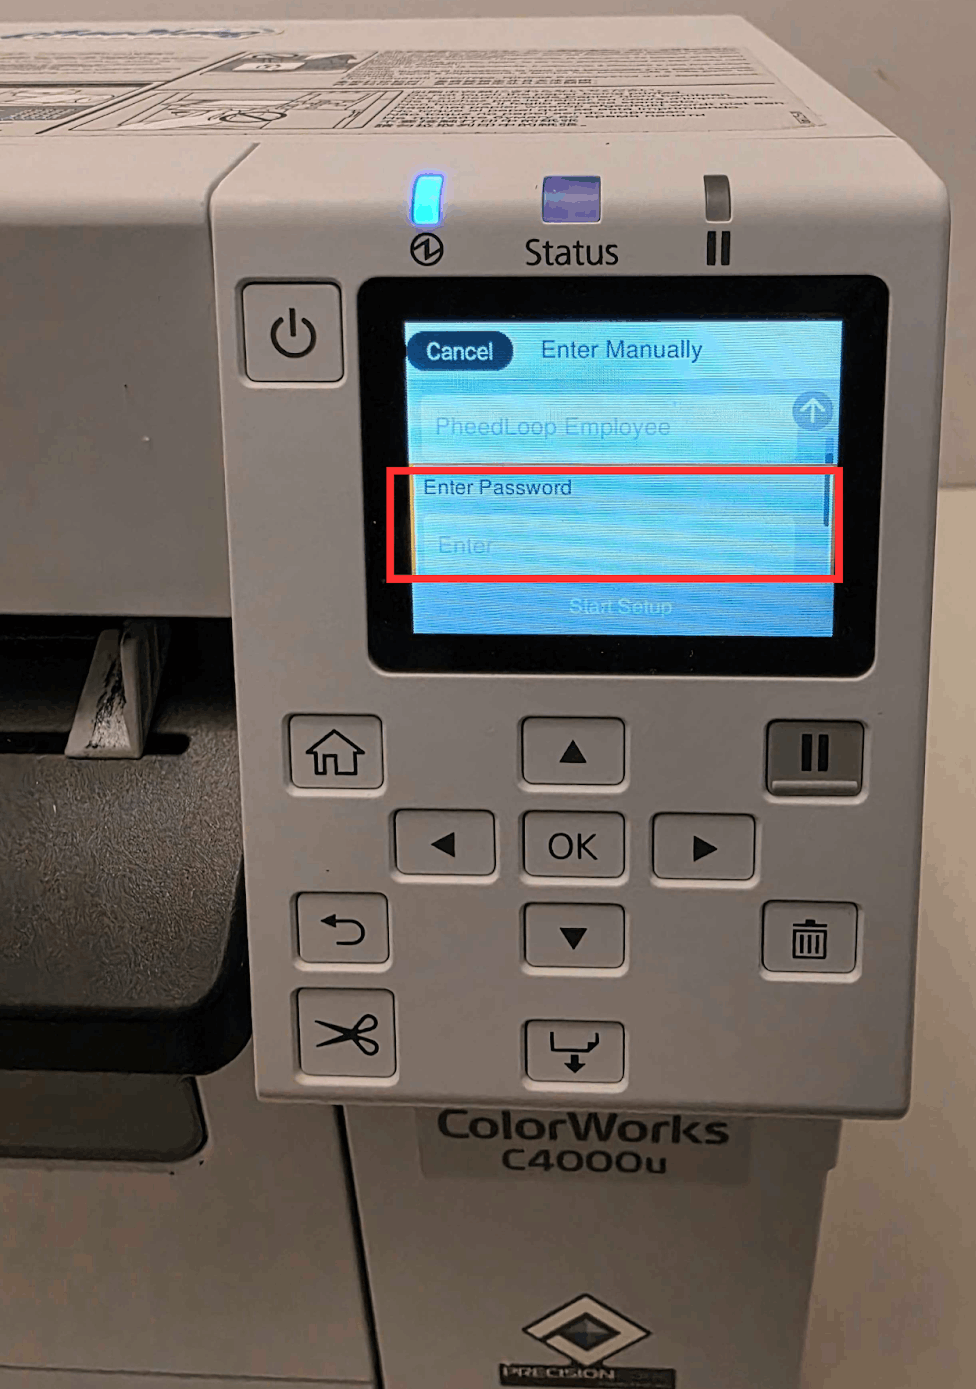
- Select Start Setup to complete the process


The printer will then display a success message.
Checking Your Epson is Connected to Wi-Fi
To ensure the Epson is indeed connected, follow these steps:
-
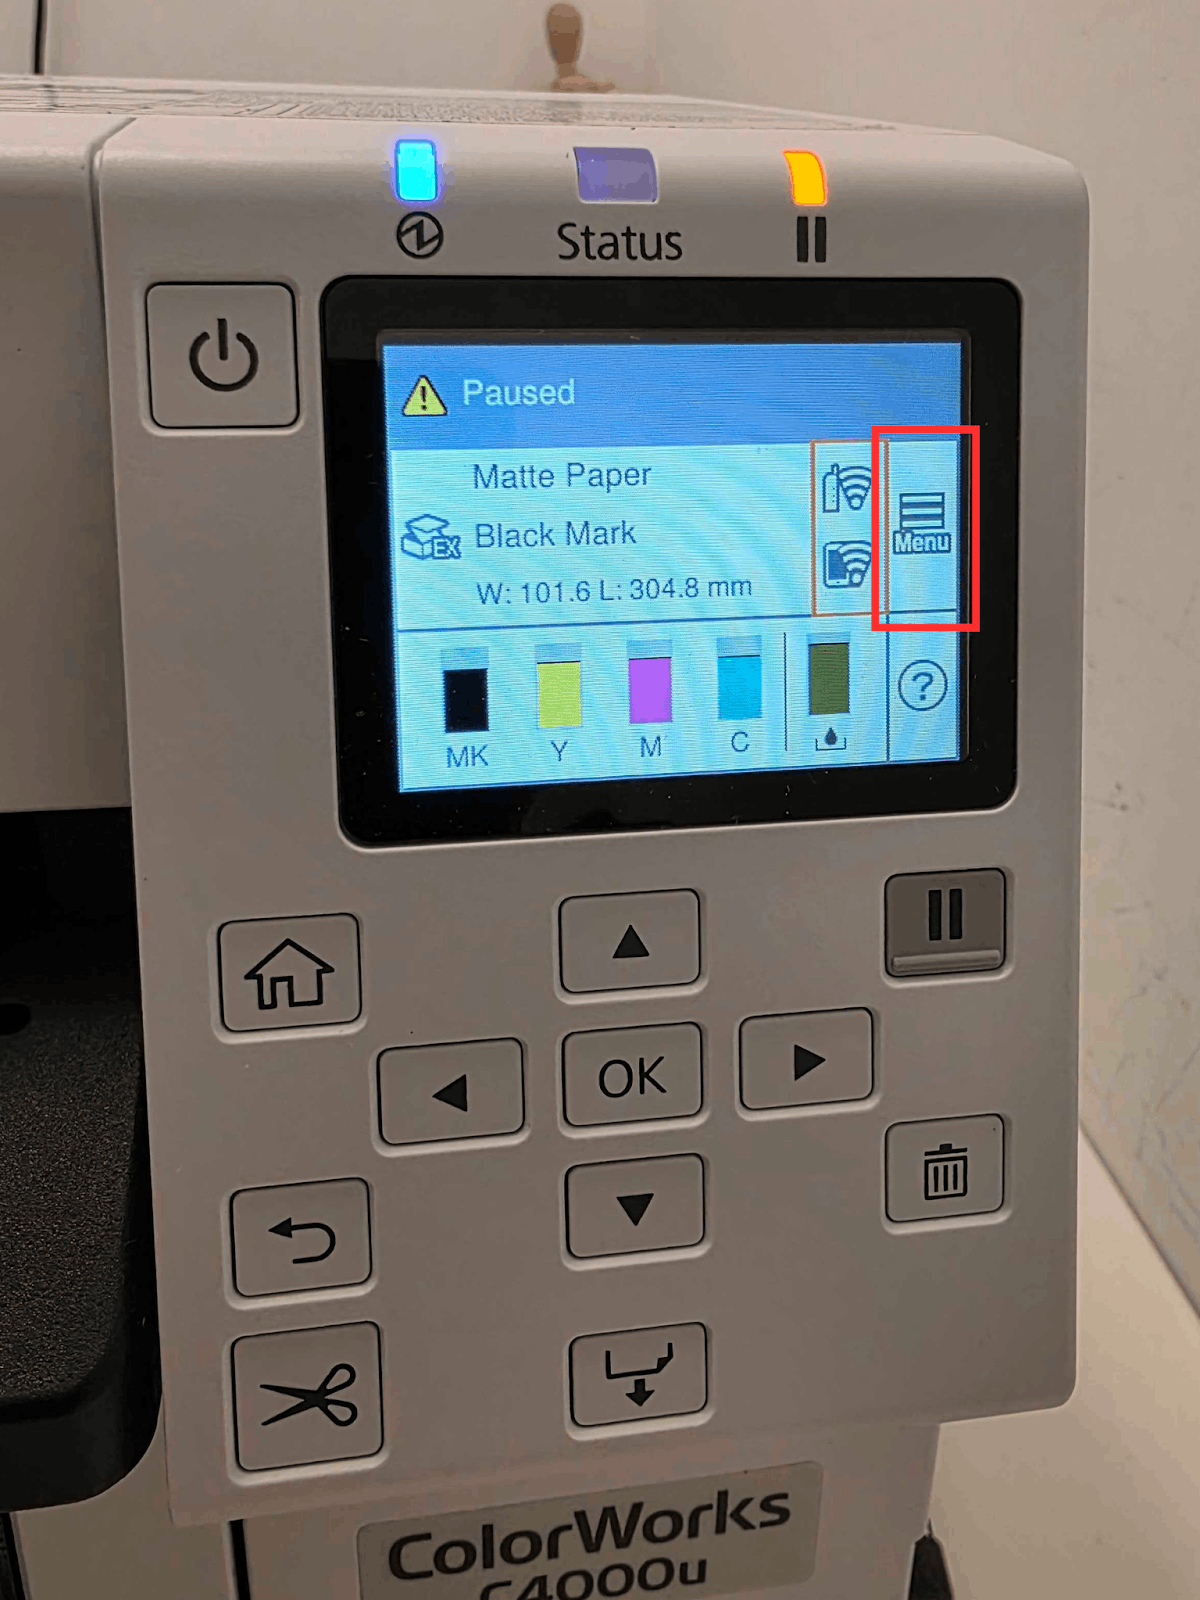
On the Epson printer, navigate to Menu using the directional arrows
-
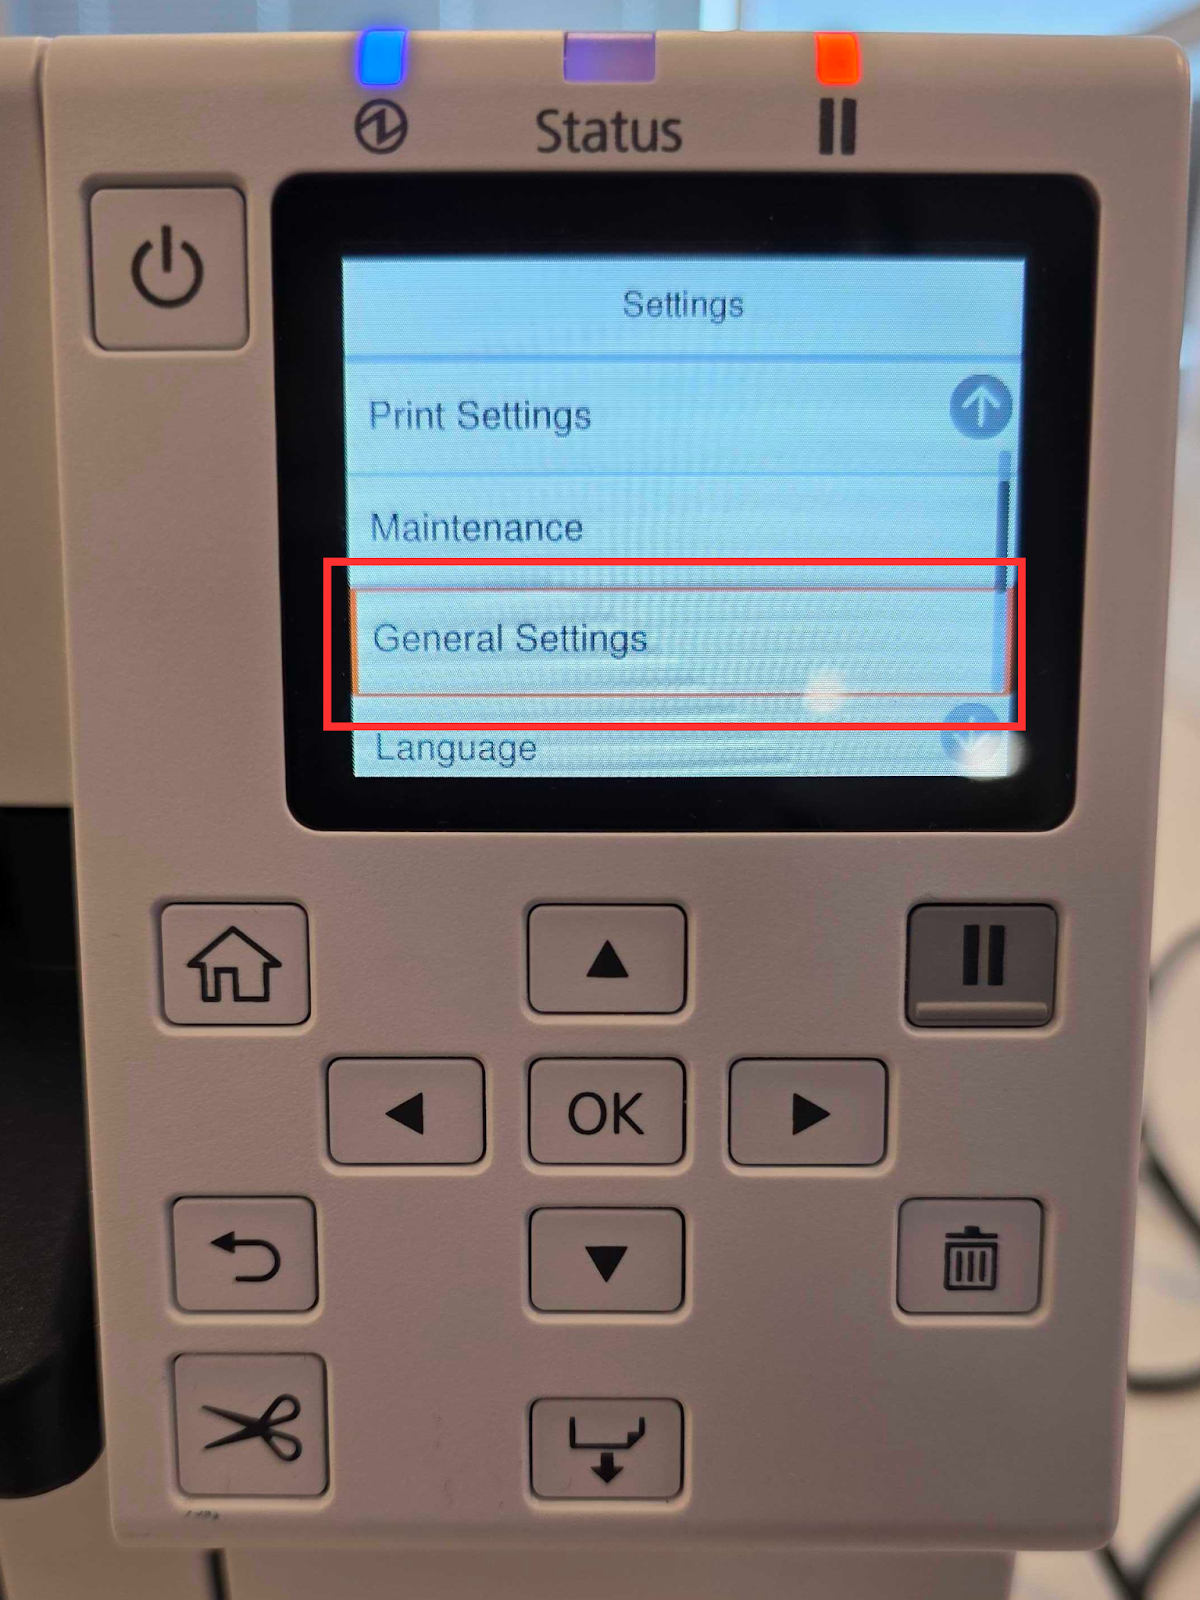
Select General Settings
-
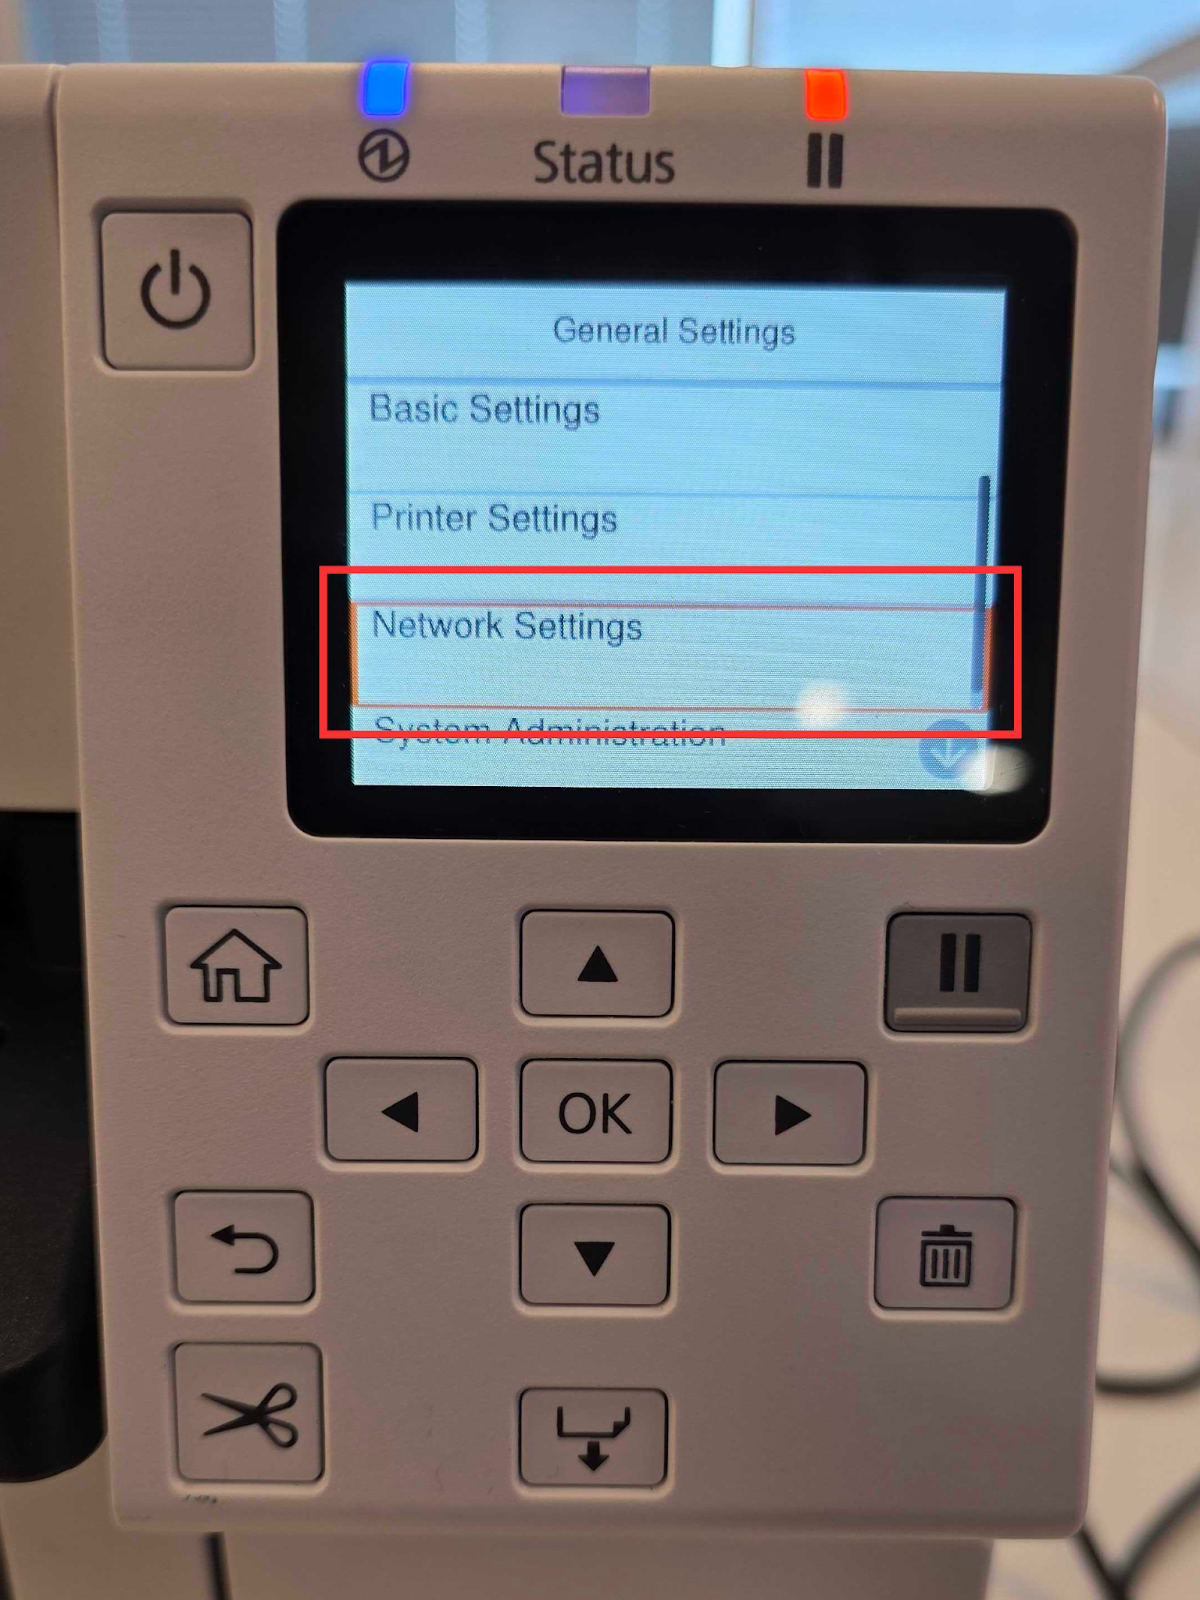
Select Network Settings
-
Select Connection Check
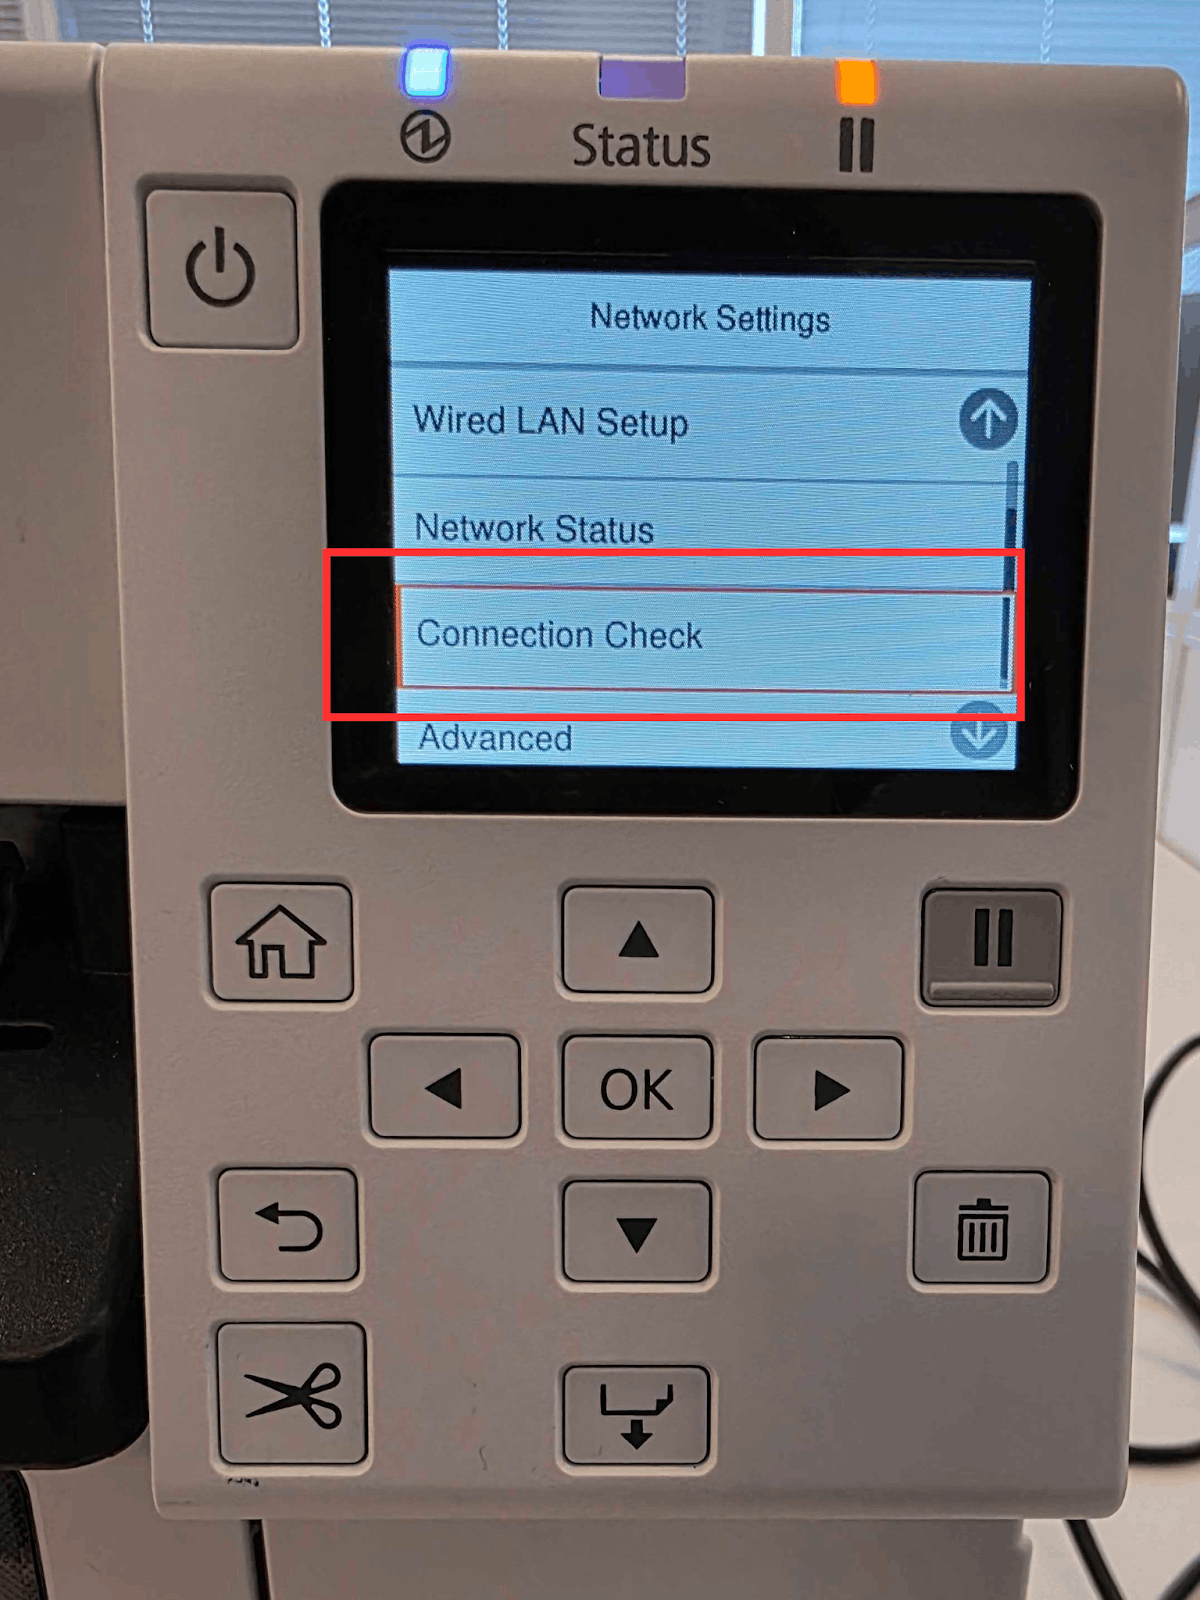


The Epson printer should now refresh and display Network Connection Verified. If this does not appear, verify the Ethernet connection is properly configured and/or the wifi is within effective range.

3. Feeding badges into Epson printers
The process for feeding badges into the Epson printer is straightforward. If you are familiar with the Zebra Printers offered by PheedLoop, the process follows a similar procedure. Badges are positioned behind the Epson printer and fed through until it reaches the front.

3.1 Feeding Badges through the Epson printer
When inserting badges, it is important that they are facing the appropriate direction. Ensure the ink with the instructions is facing downwards before feeding it into the printer. The text shown in the picture below should be facing DOWN.

Once the badges are placed appropriately, lift up the hatch from the back of the printer to reveal the rear entrance. On the front of the printer, pull the grey latch to the left of the feeder to unlock the feeder. This is necessary, or else it won’t move for the badge to feed in.

The front of the Epson printer needs to be open as well to allow for the badges to fully feed through. Lift the gray handle at the front to open the Epson.

Next, take your badge and feed the badges through in a gentle manner; leave at least an inch of the badge sticking out of the front.

The final step is to close the Epson printer. Some of the badges will stick out; this is intended.

Similar to Zebra printers, the printer will be in a pause state. Select the pause button to resume the printer. Afterwards, the printer will feed the badge through as part of the calibration process. Once the printer is done, you will have completed the process of feeding badges into the Epson printer.
3.2 Calibrating the Printer Manually
If you run into any errors and need to do a manual calibration, follow these steps below.
-
From the Epson’s screen, select Menu
-
Select Maintenance
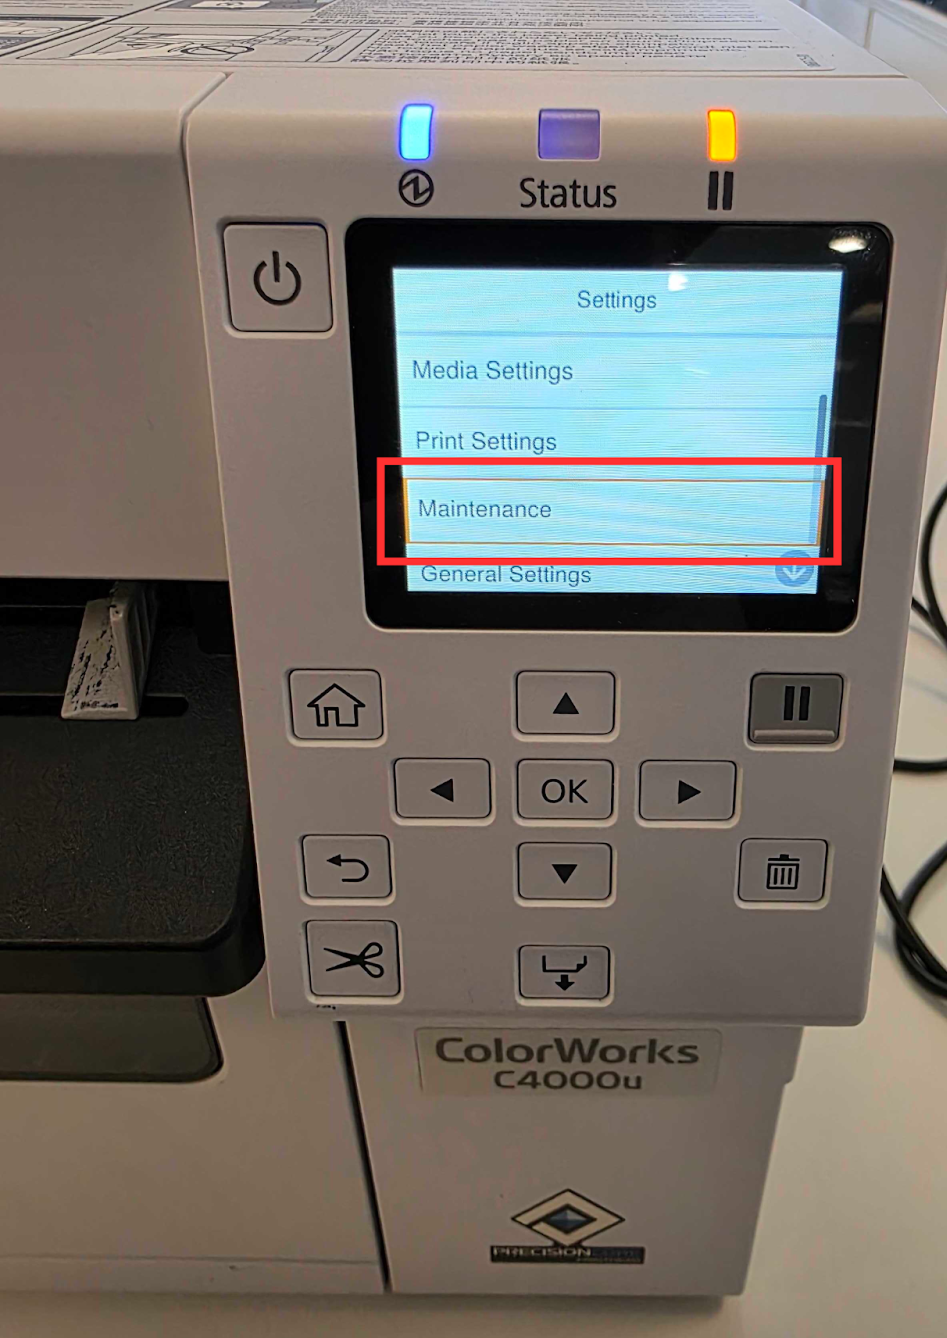
-
Select Calibration
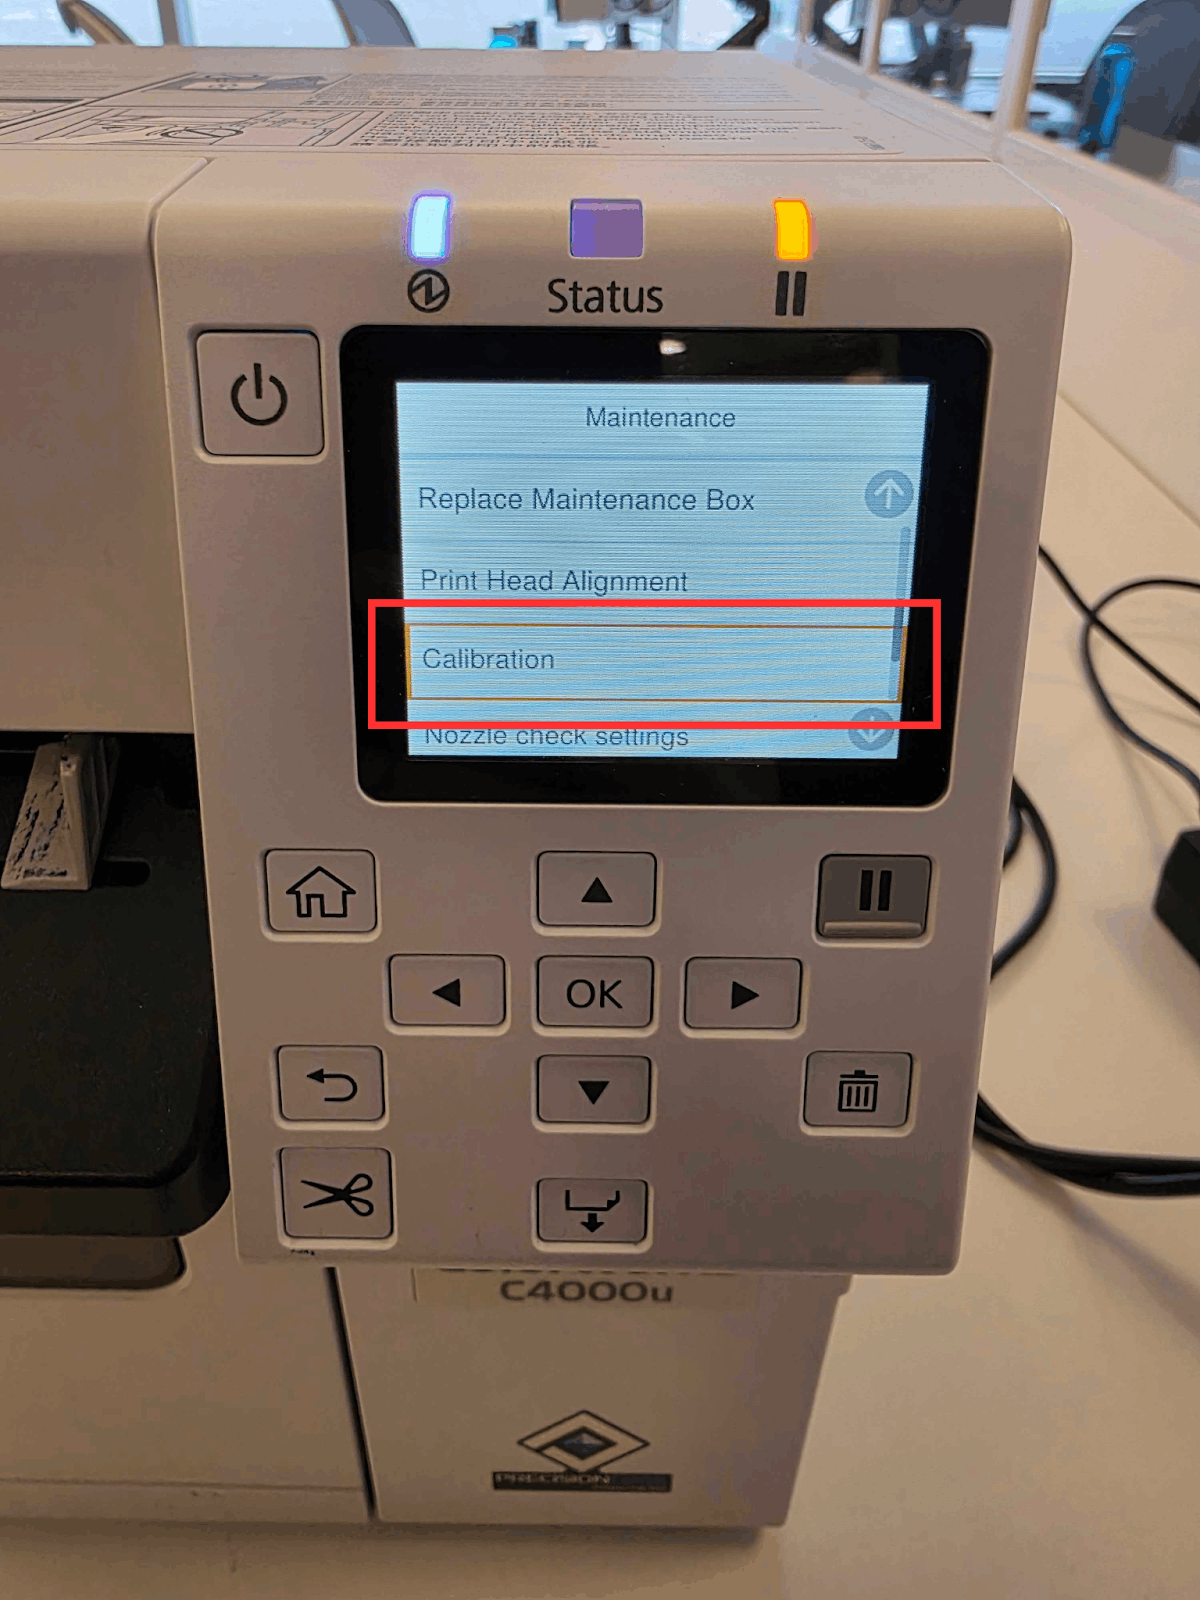
-
Select Media Detect
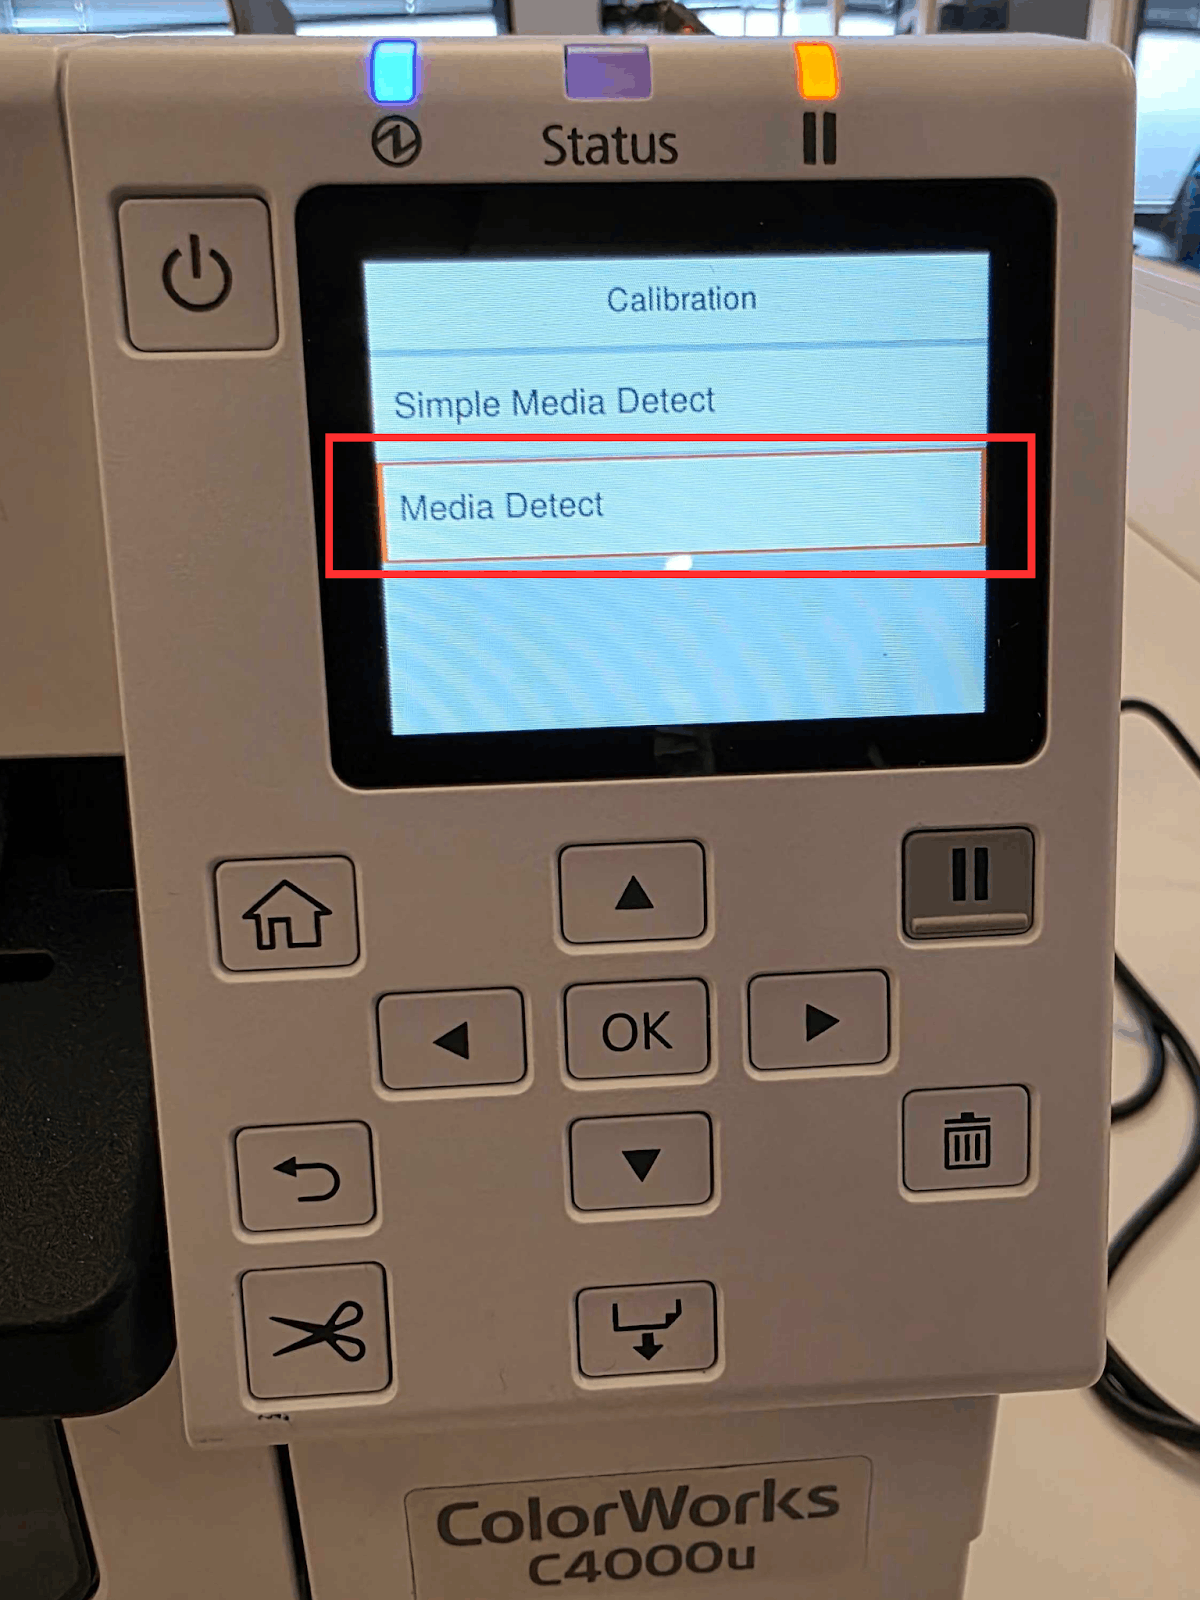
-
Select Start
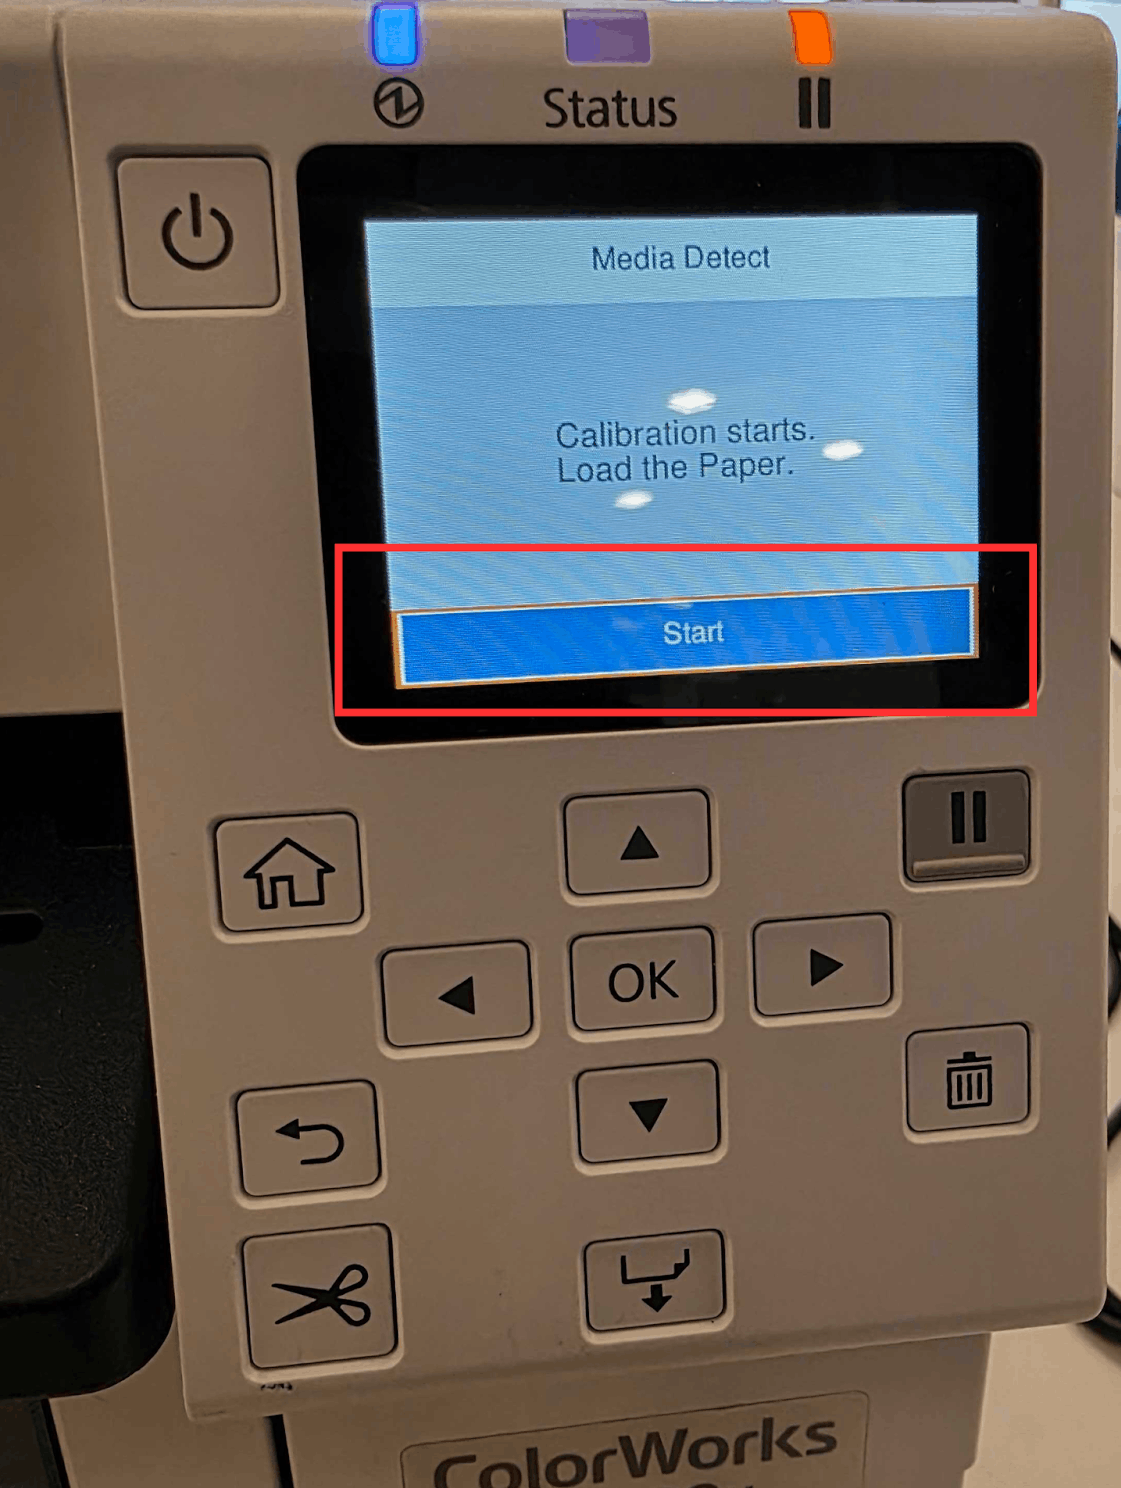


The printer will move the badge around as part of the calibration process before settling on the next badge.
4. Connecting Epson printers to PheedLoop OnSite
Please note that Epson printers can only print with the Epson Colorworks Badges Badge Template.
At this point of the walkthrough, your Epsons should be set up and ready to connect to the iPads through PheedLoop OnSite. Before starting this section, please ensure that you have completed 2.4 Connecting your Epsons and iPads to the Router and that your iPad is connected to the same network as the Epson.
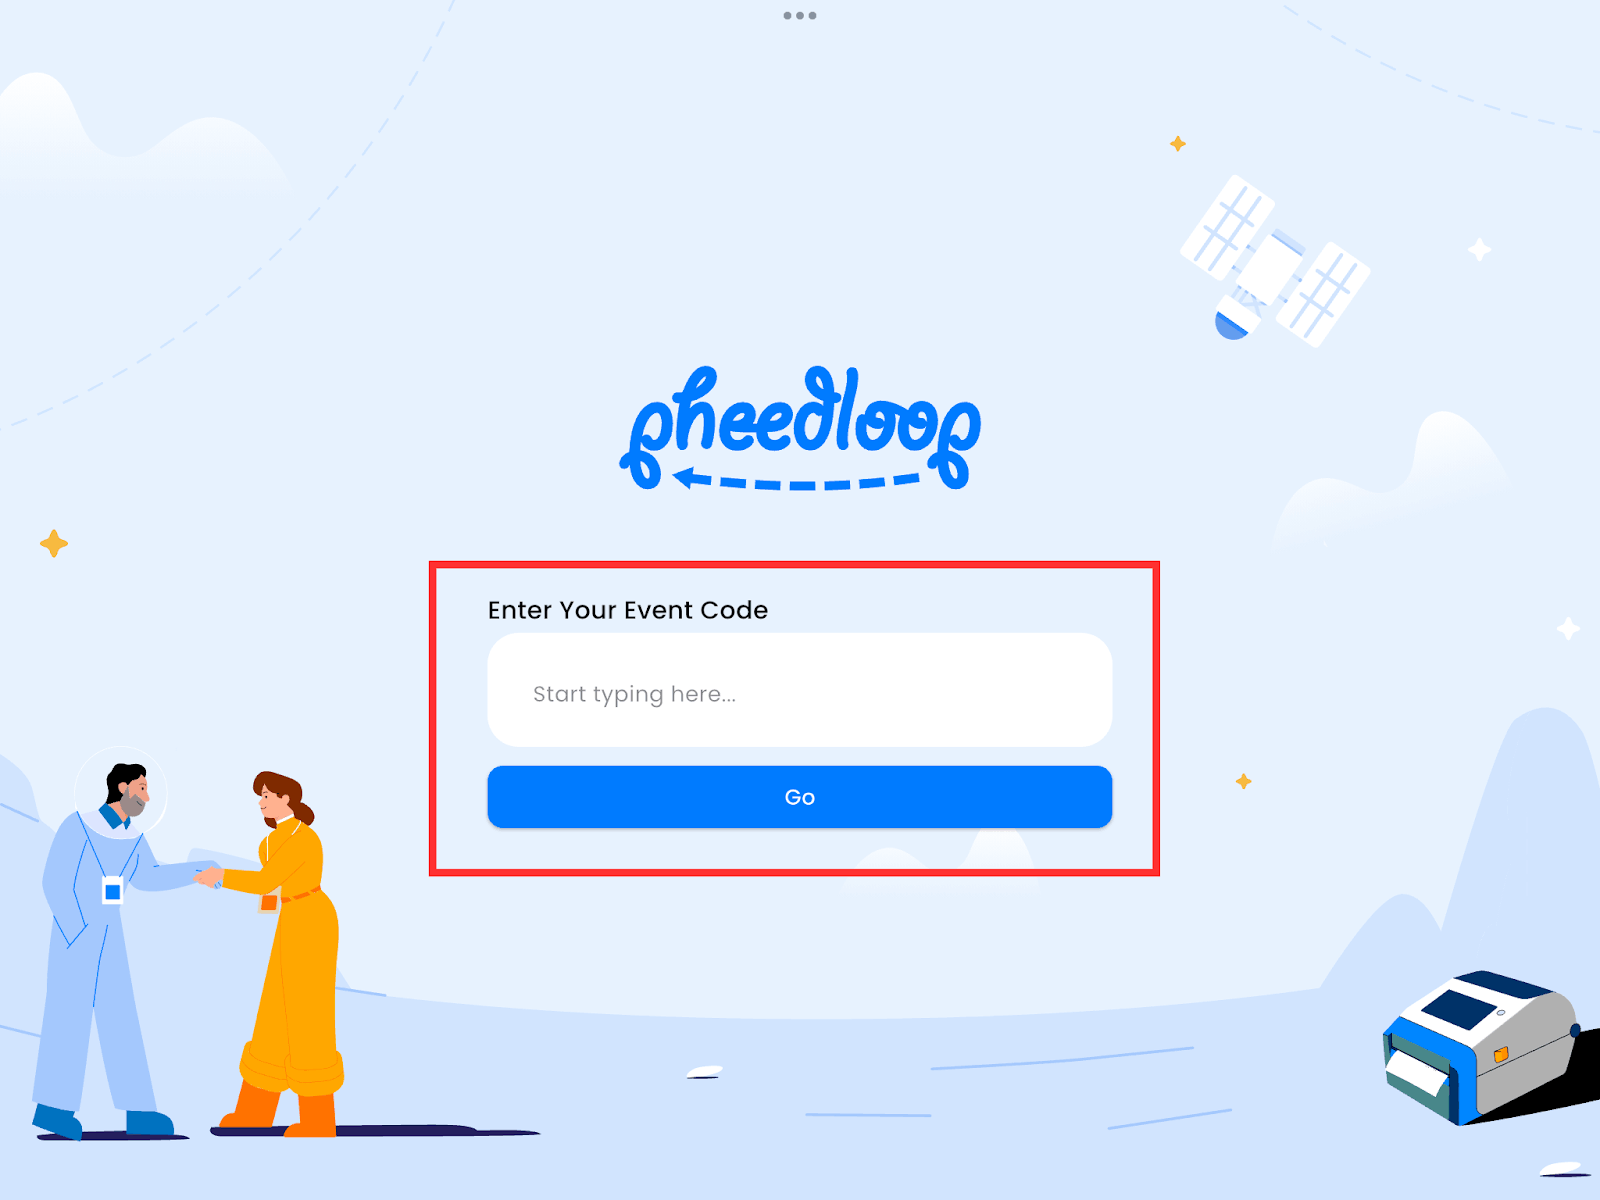
- Open PheedLoop OnSite on your iPad
- Access your event using the Event Code or Custom URL Extension
-
Both of these are available in the Event Dashboard under General > Details
-
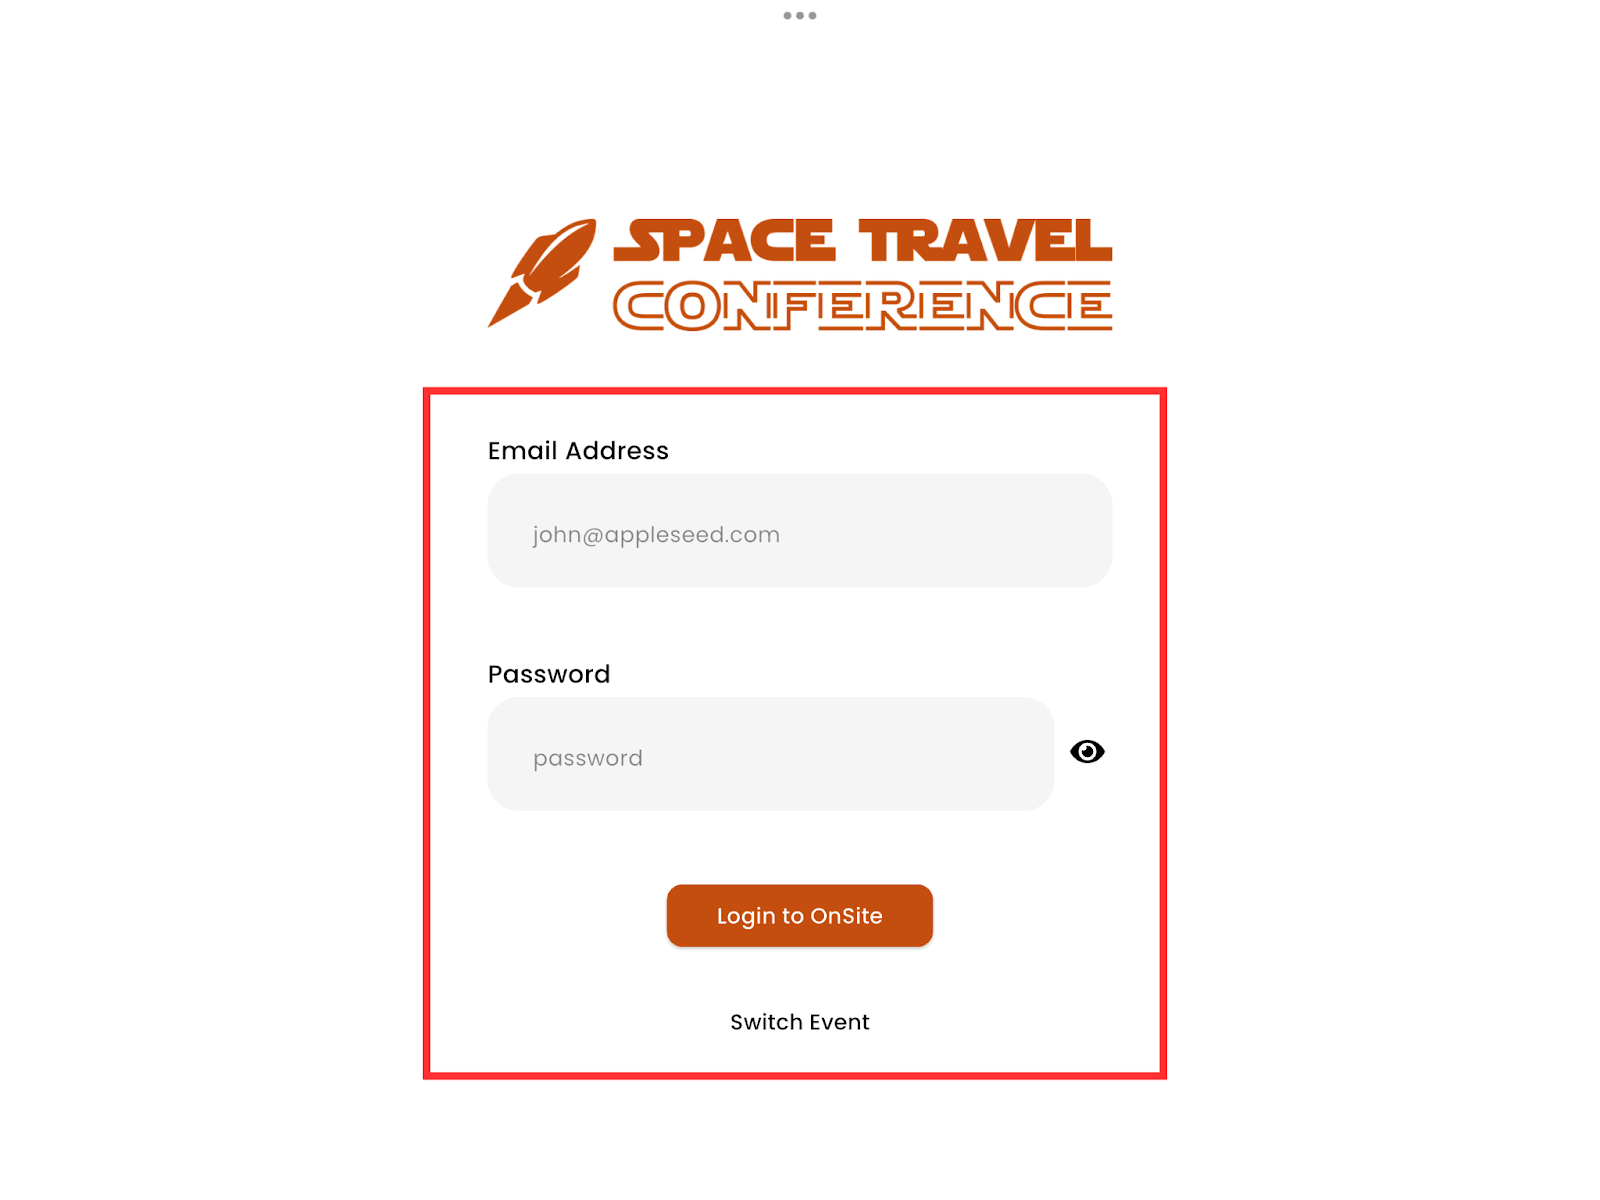
- Login with your staff credentials
-
This can either be from an Event Administrator or Staff Member.
-
-
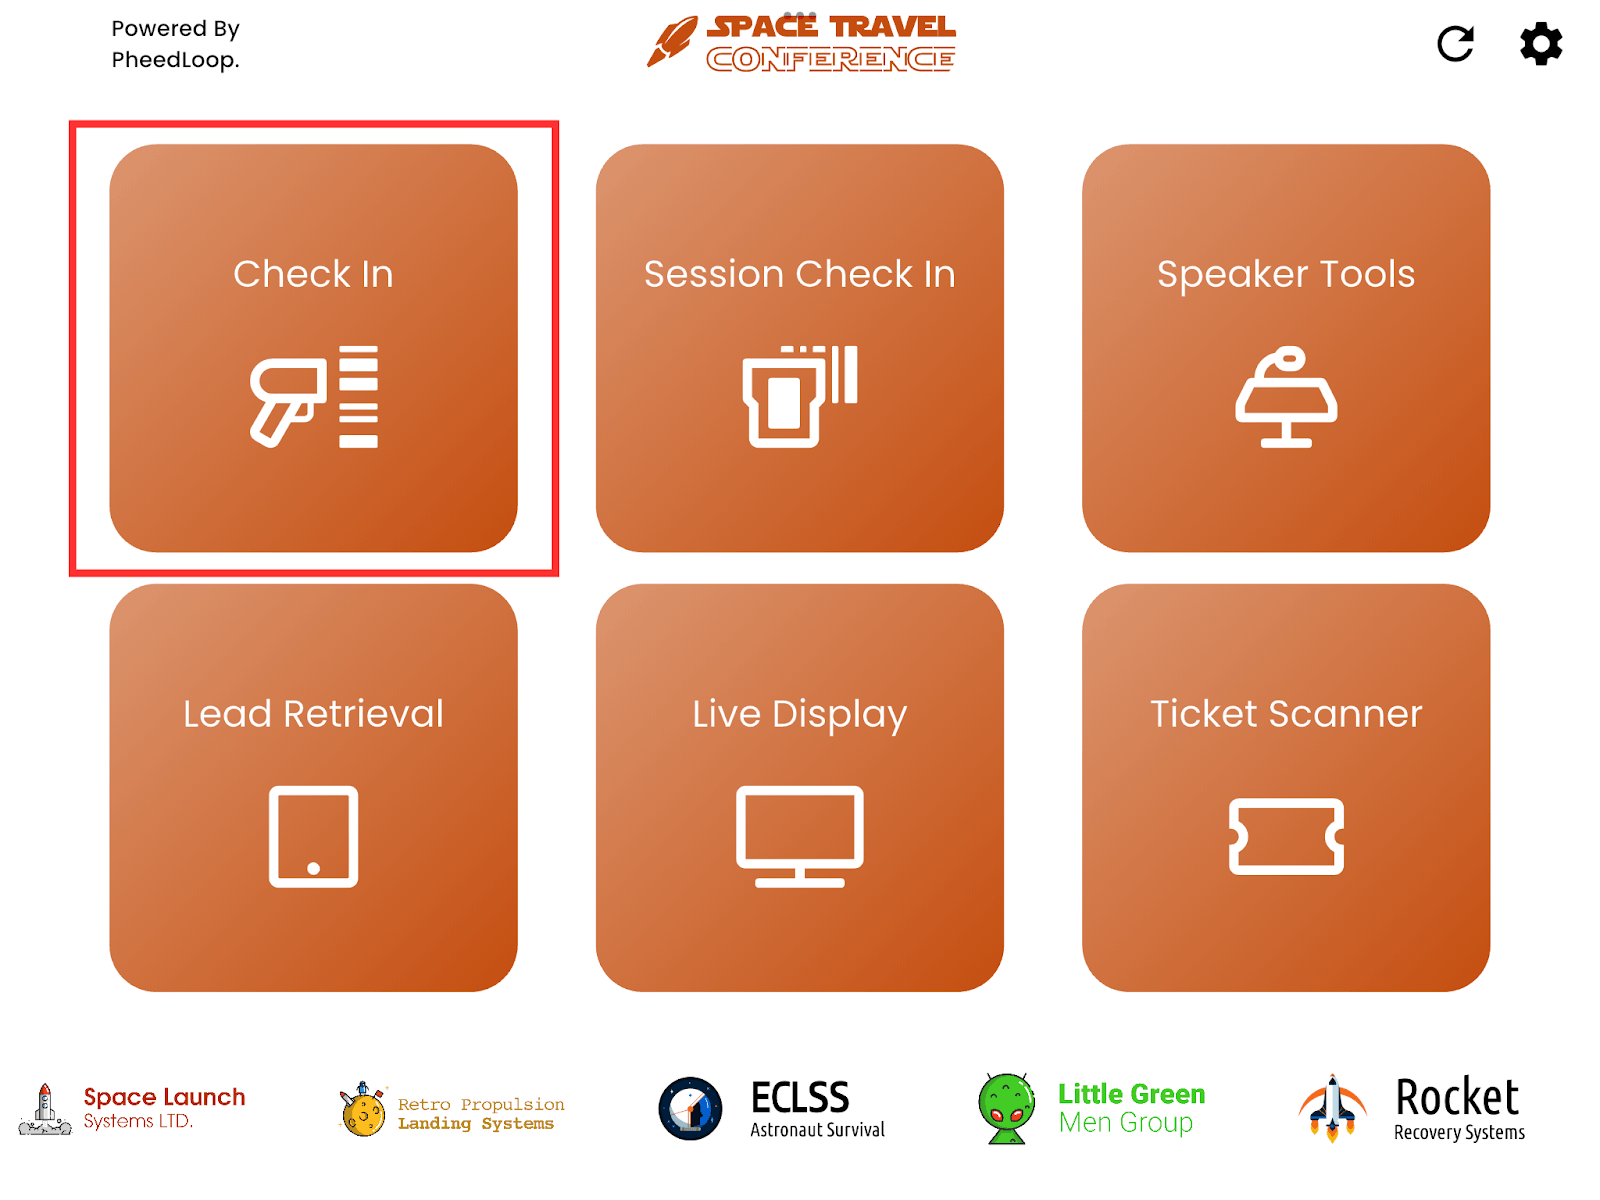
Select Check-In
-
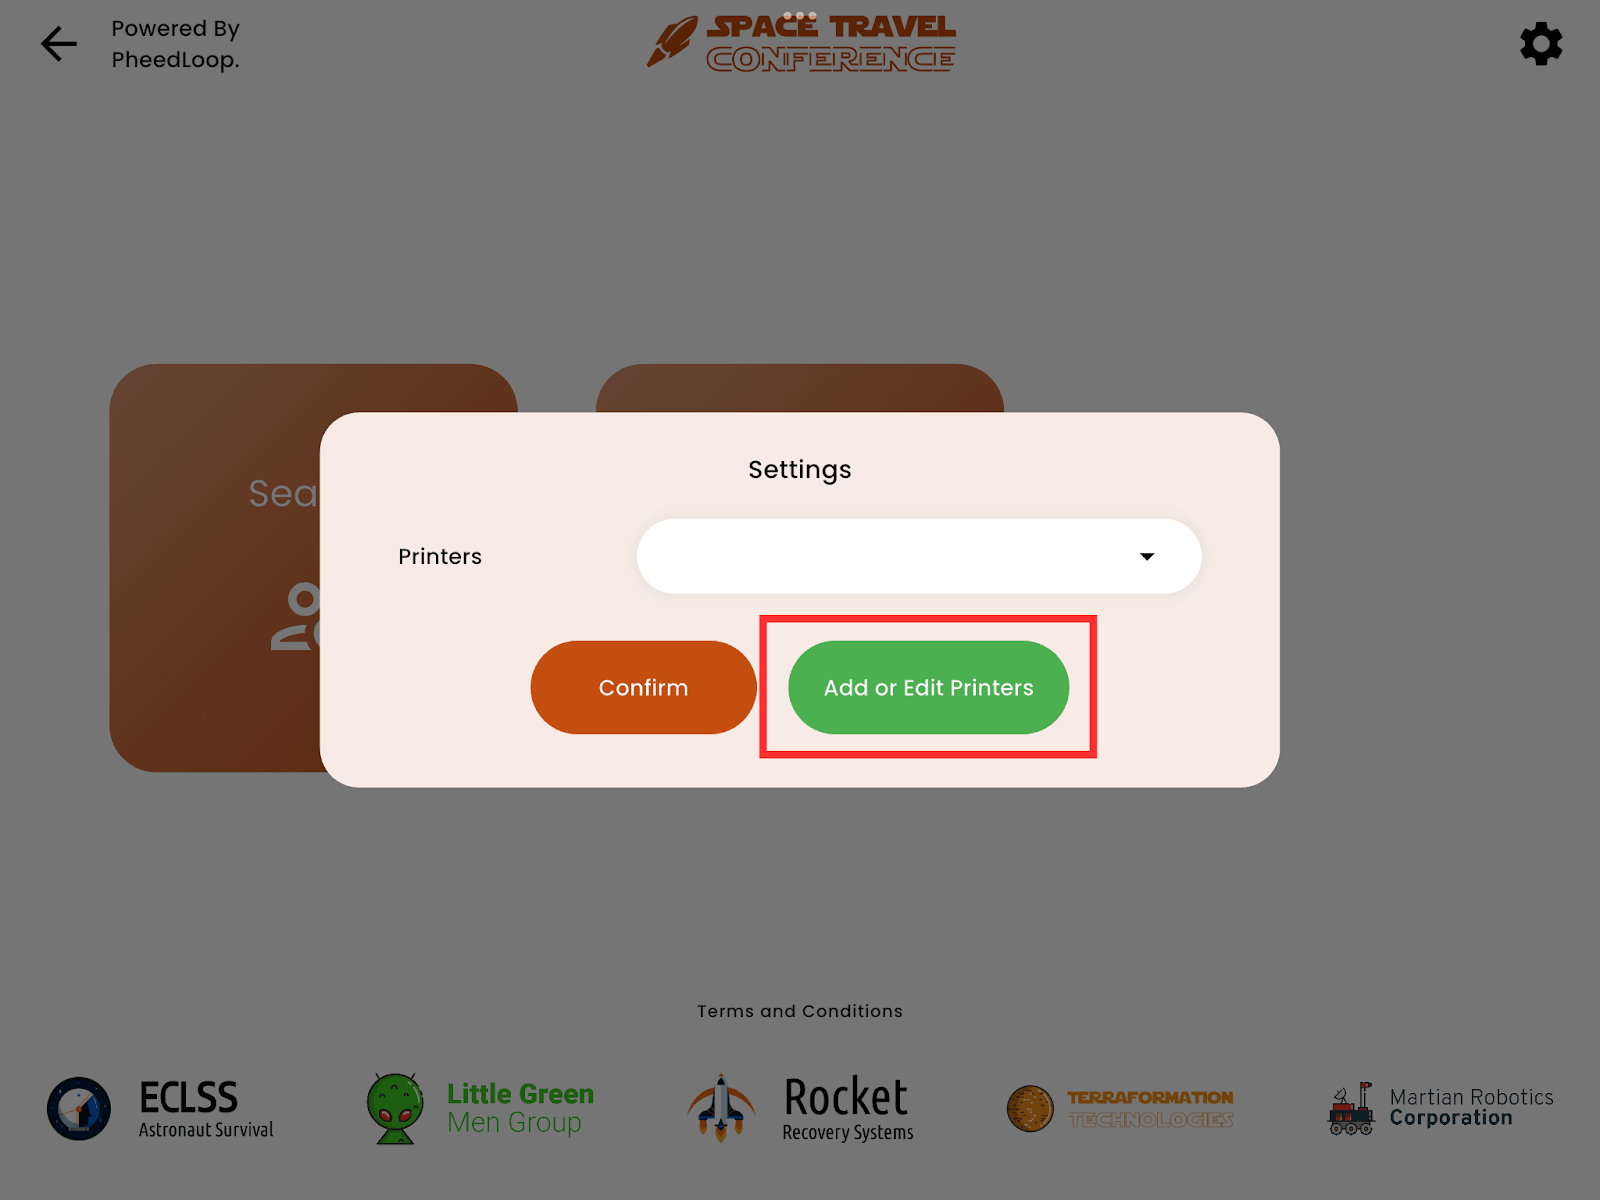
Select the settings ⚙️ icon on the top right corner
-
Select Add or Edit Printers
-
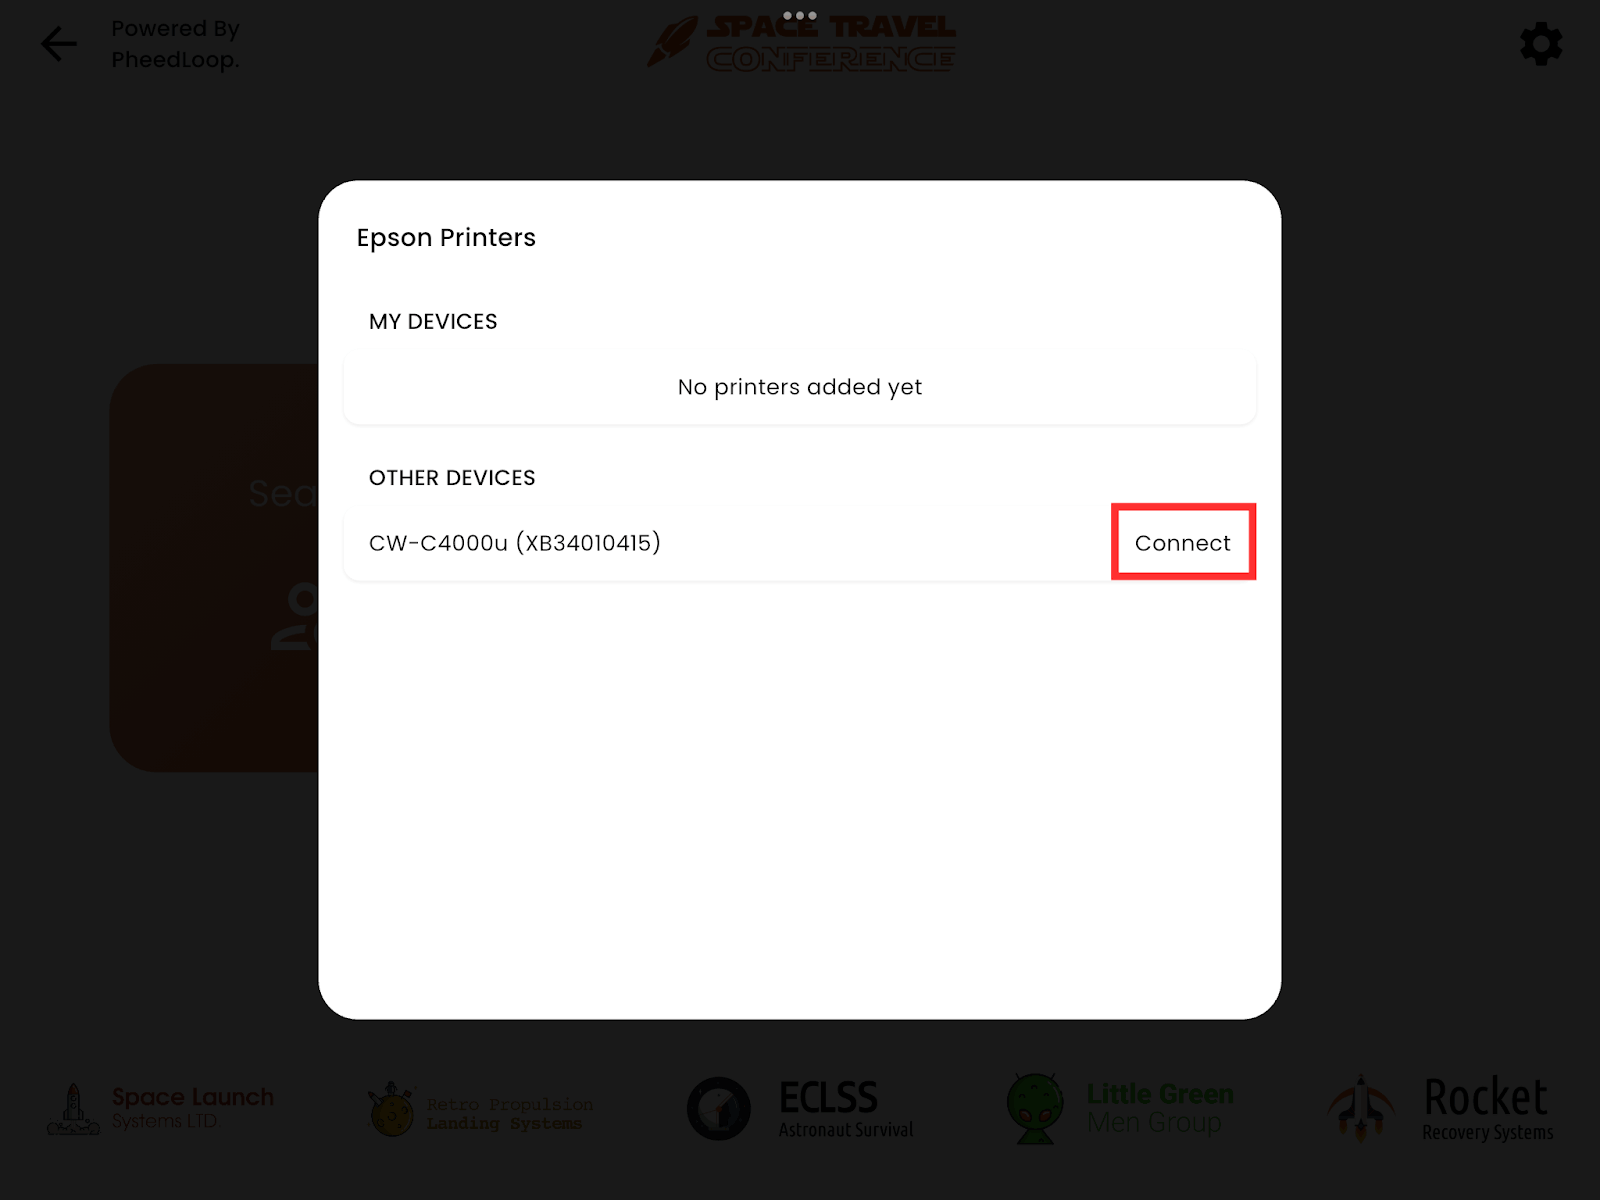
Select Epson printer
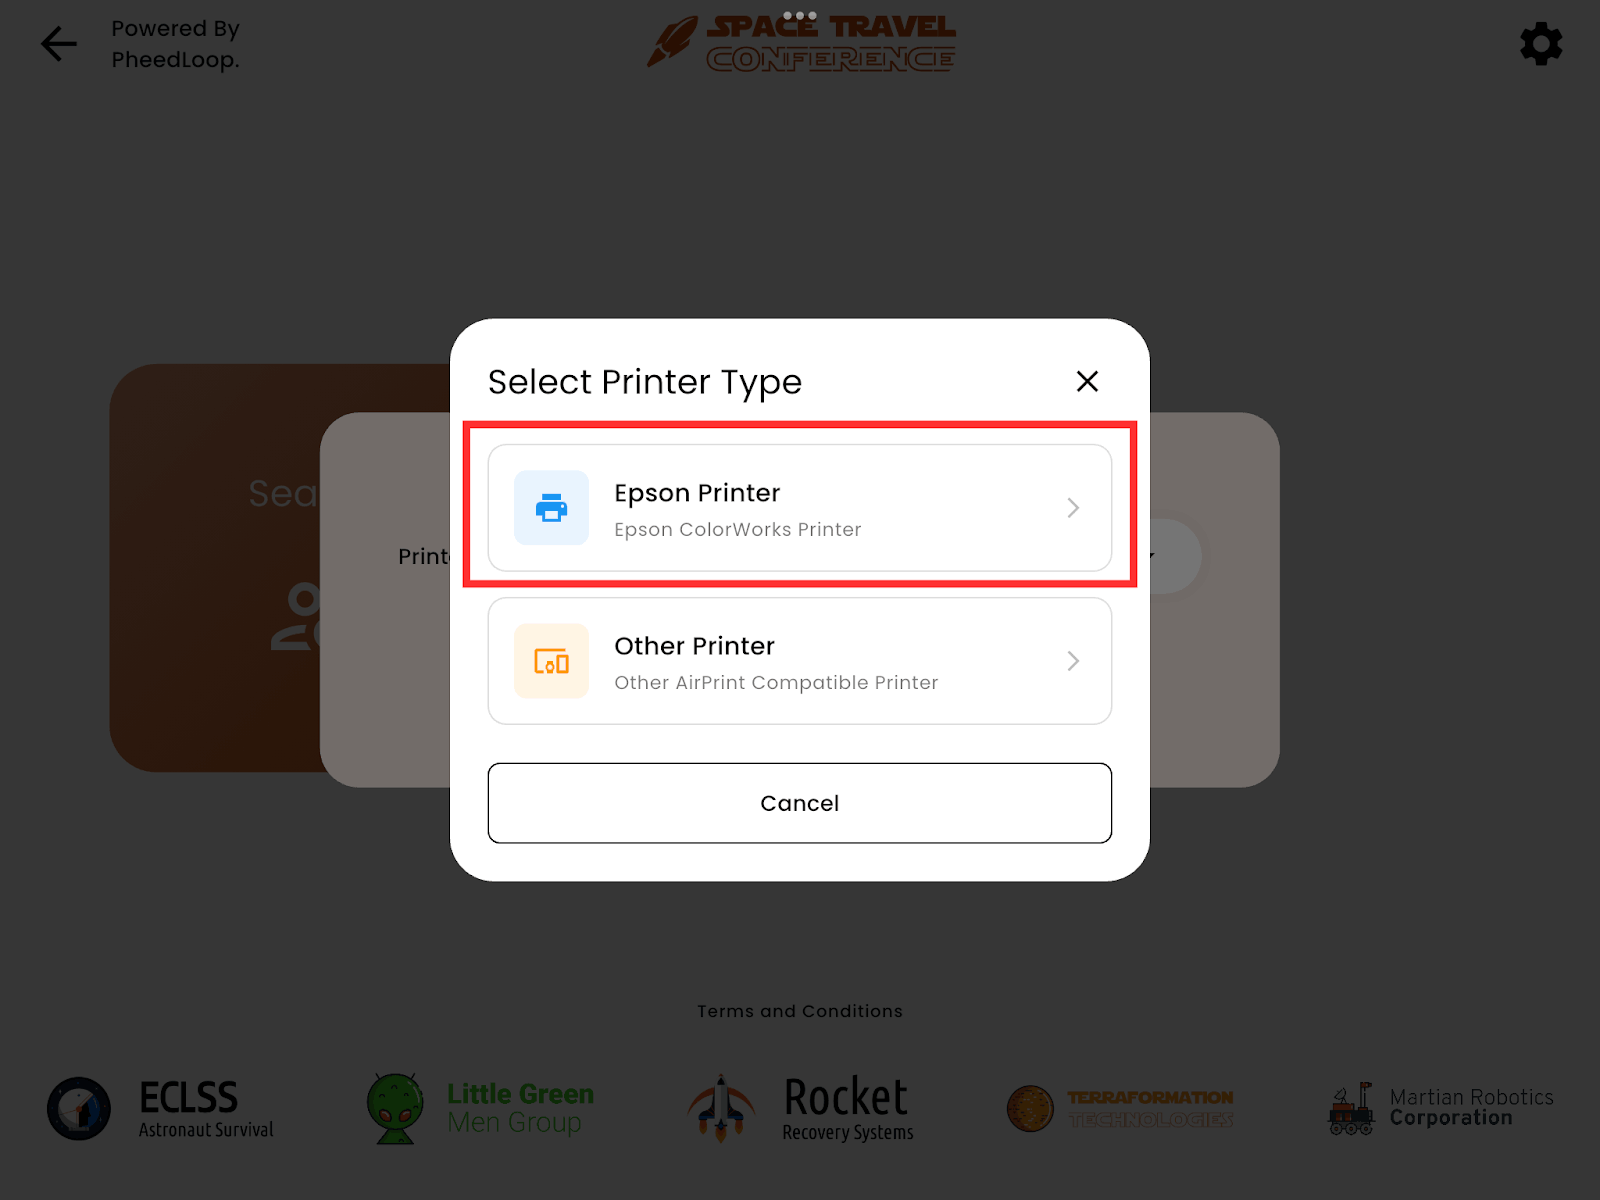
- Under Other Devices, select Connect the Epson printer
-
Each Epson printer has a unique serial number on the back, near the outlet. Instructions for finding this will be shared below.
-
- Close the pop-ups until you reach Settings again
-
Under Printers, select your new Epson printer and select OK

-
Select Confirm
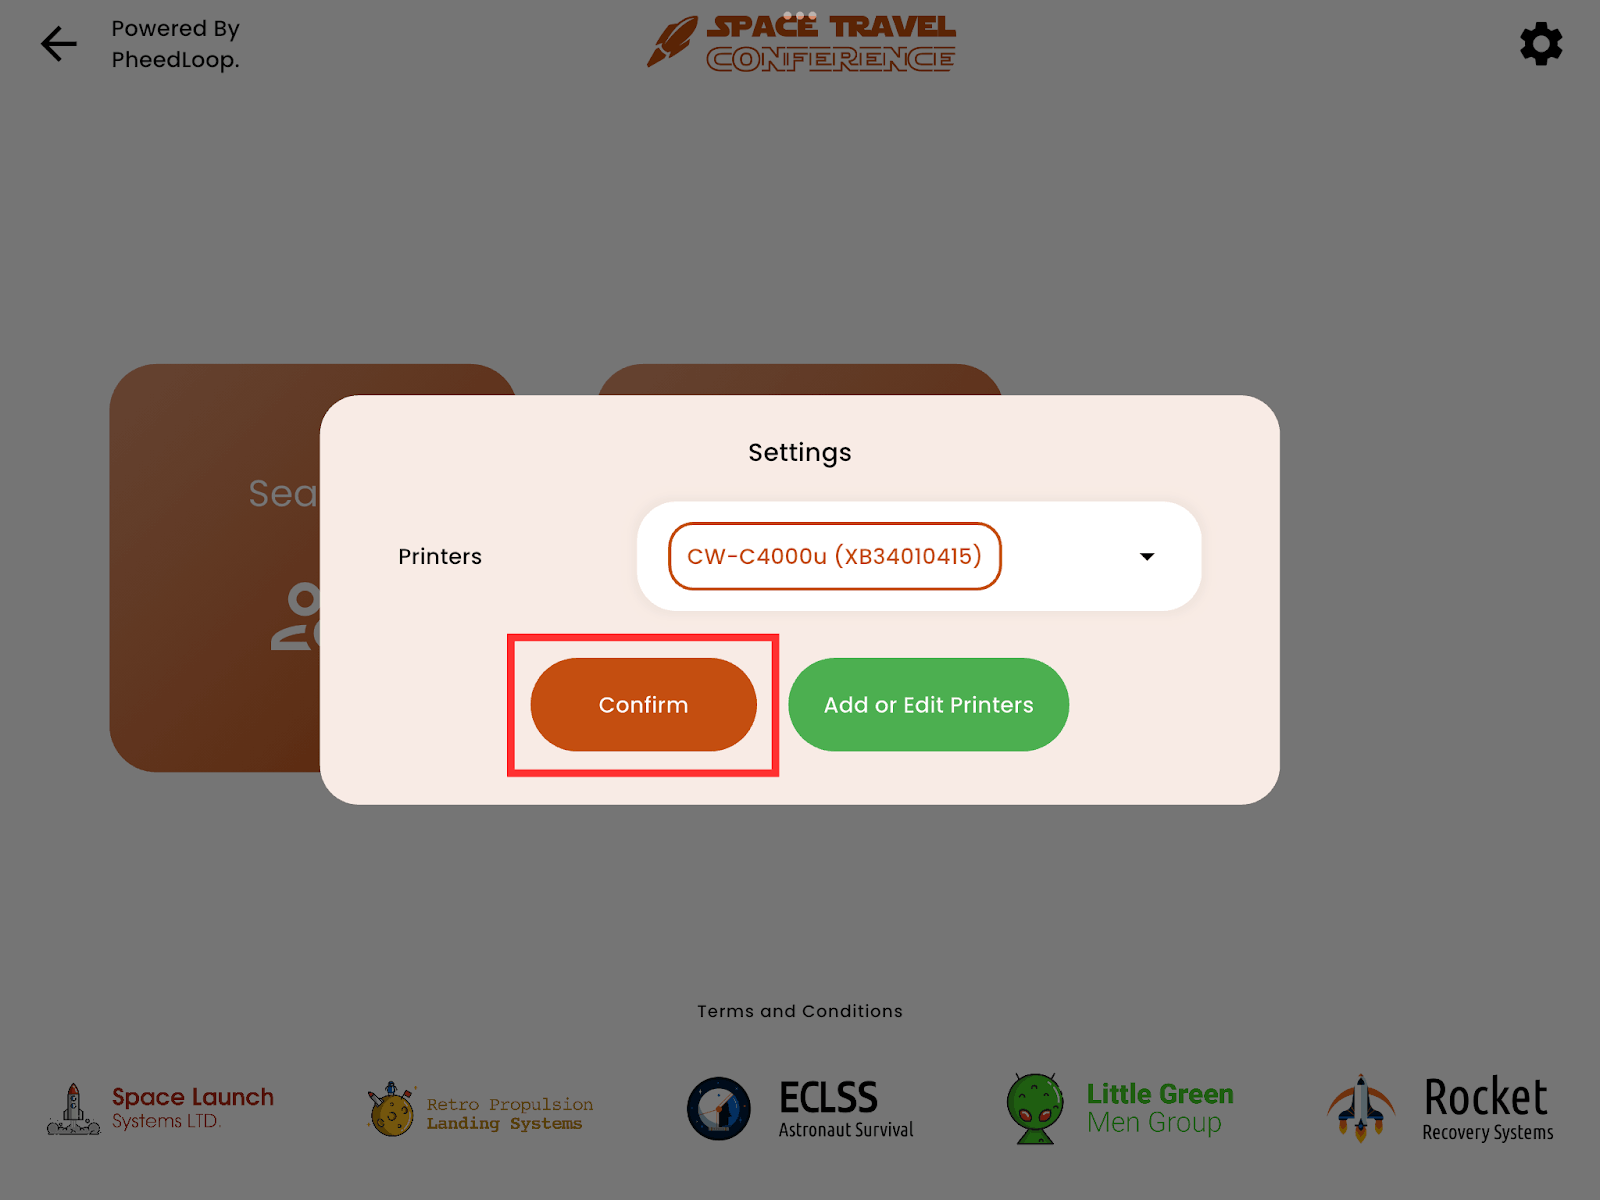


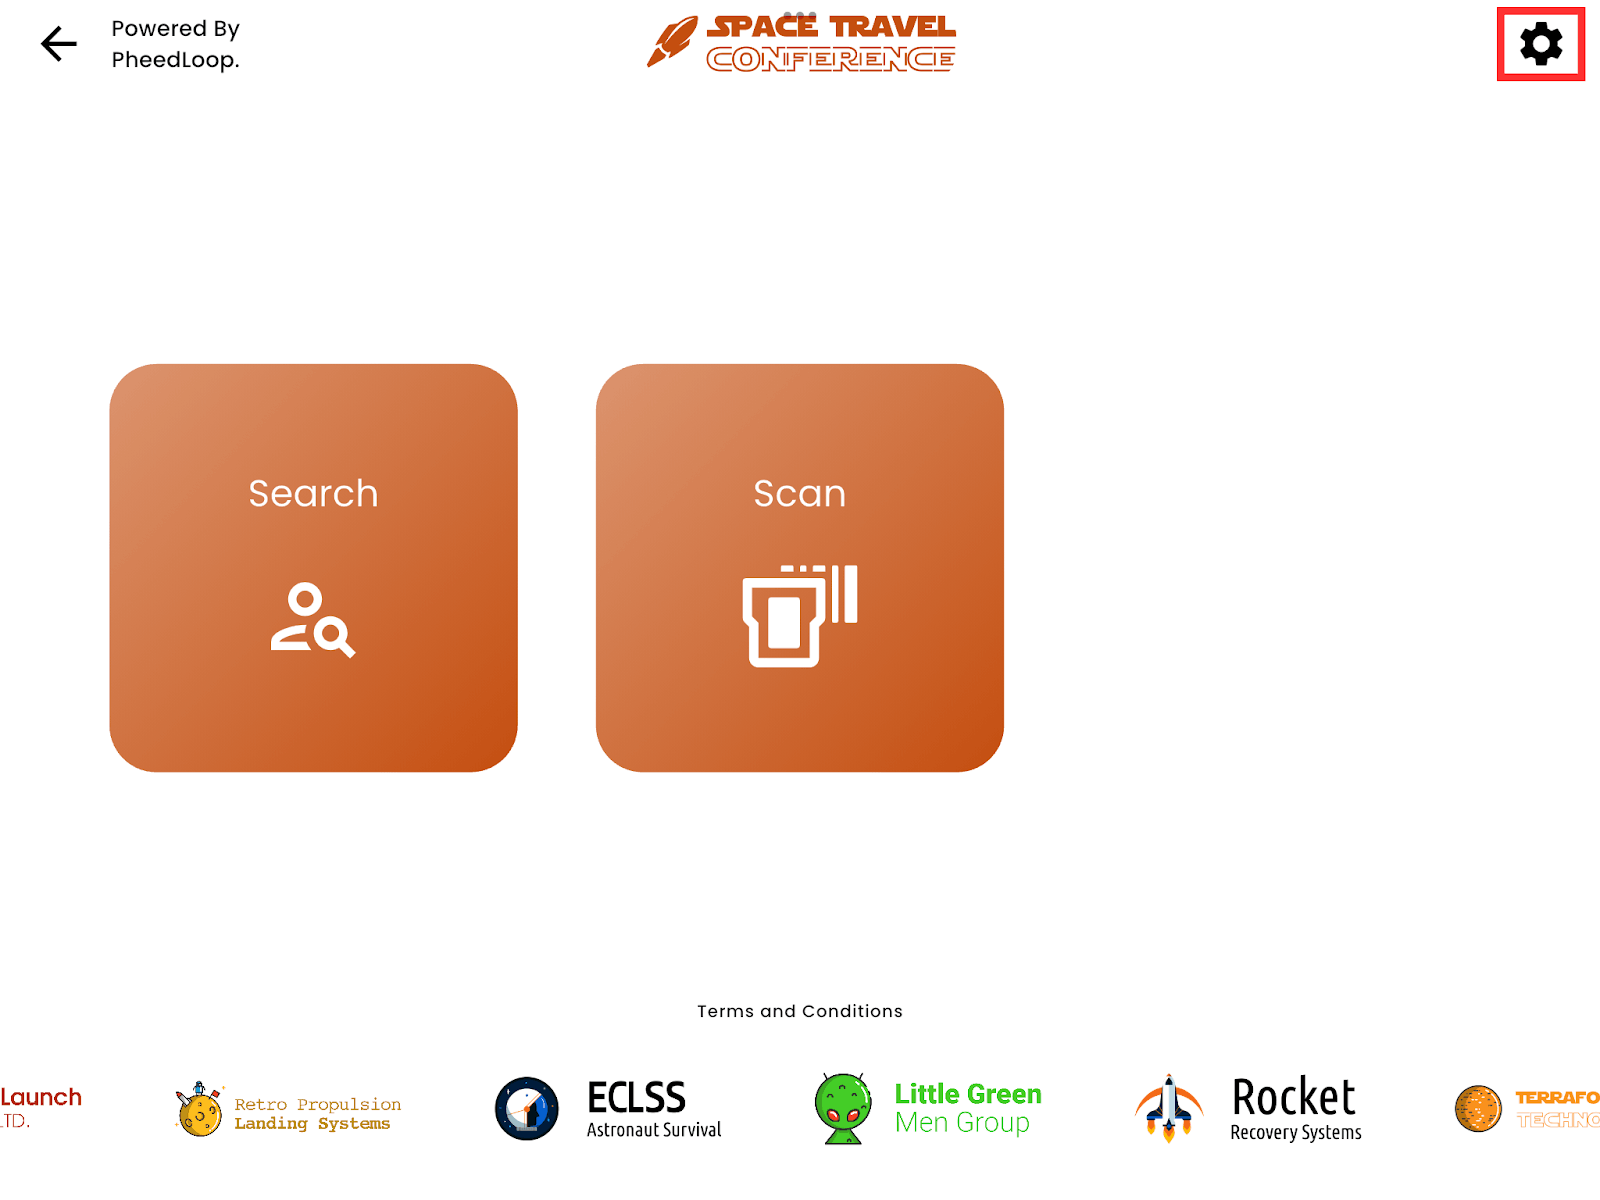
Your iPad should now be connected to the Epson and ready to print. Conduct a test print by either searching for a test attendee with Search or scanning an attendee badge QR code with Scan.
Each Epson has a sticker on the back displaying the serial number.

And that’s all! You’ve now successfully set up your Epson printers. If you have encountered any issues or questions, please proceed with the remainder of the article.
5. Troubleshooting
5.1 Printer Not Found?
If your printer doesn’t show up, try these quick fixes:
- Double-check that both your iPad and printer are on the same Wi-Fi network
- Make sure Allow Local Network is enabled for PheedLoop OnSite in your iPad settings
- Close and reopen the PheedLoop OnSite app
- Try turning the printer off and back on
Still having trouble? Your venue’s network might have security settings that block device discovery. Reach out to the venue’s IT team and let them know you need the printer whitelisted on the network.
For more information, please refer to our Epson printer Not Working? Step-by-Step Help article.
5.2 Fine-Tuning Your Prints
Every printer is a little different, and you might need to adjust a few settings to get perfect badges. Here’s how to optimize your results.
Please note that in most cases, the Epson printer should already be sufficiently calibrated to cut badges. Only change the settings if you are experiencing issues or at the advisement of a member of the Logistics Department.
To access your printer settings, follow these steps.
- Select Check-In
- Select the settings ⚙️ icon on the top right corner
- Select Add or Edit Printers
- Select the information ⓘ icon next to your printer
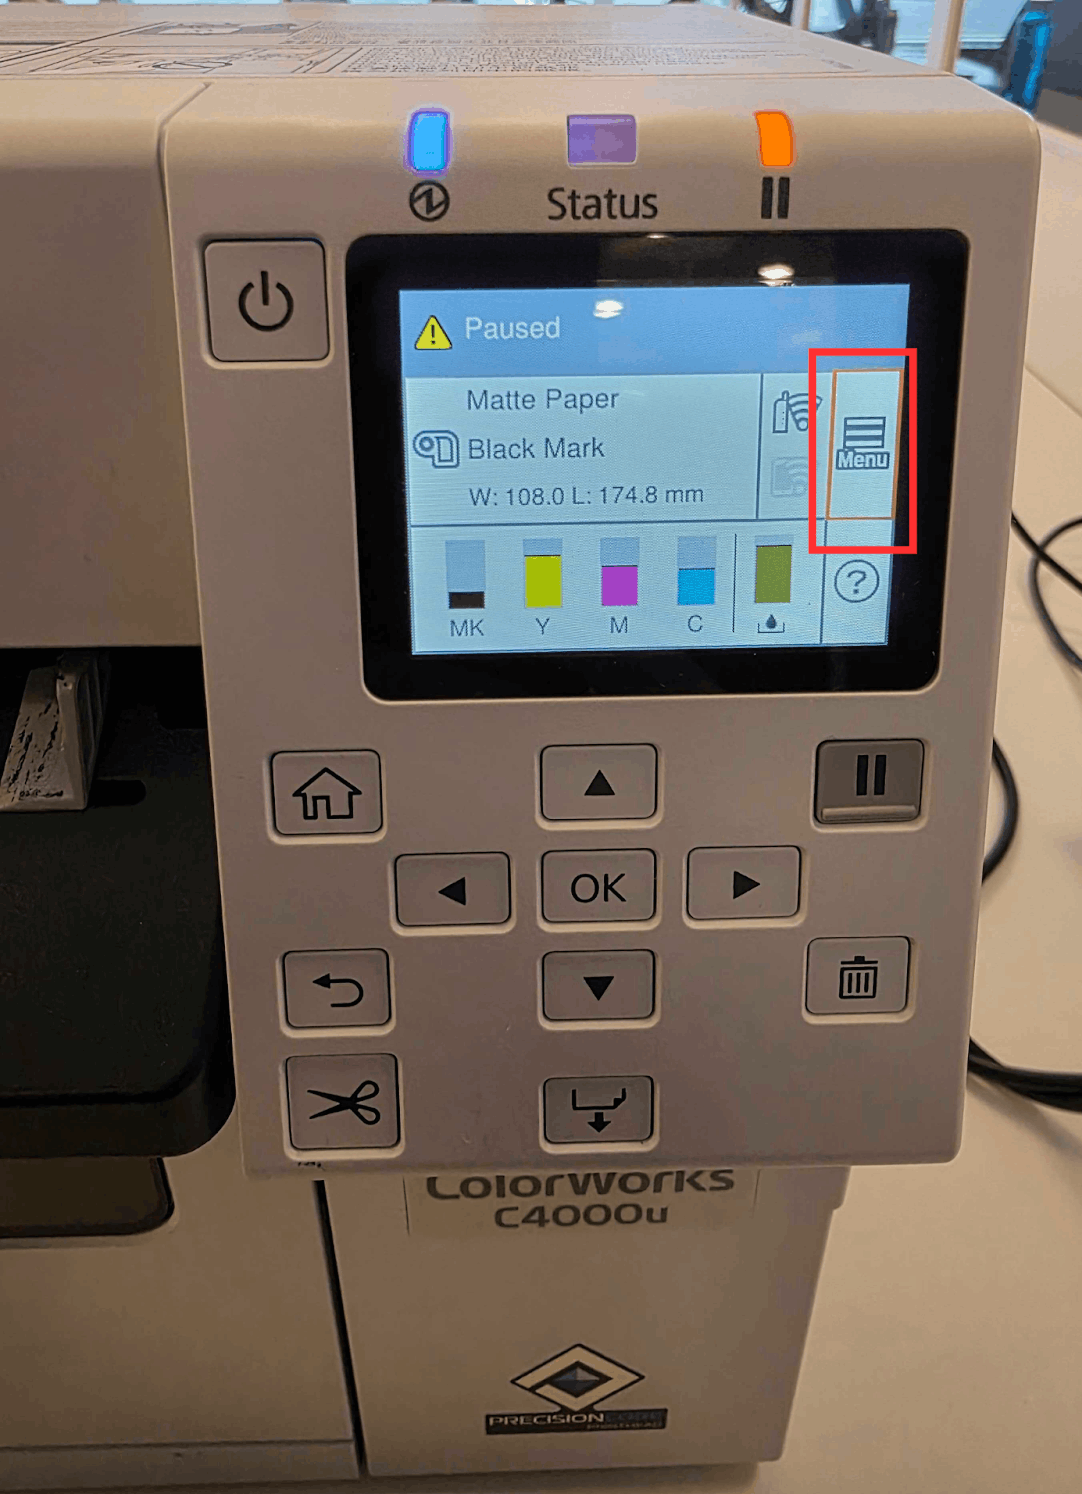
You will now be taken to the settings for your Epson printer. This page controls all facets of the Epson printer.
5.3 Print Quality Settings
In the printer settings, you’ll see options for print speed and quality. For most events, we recommend setting the print quality to Speed. This gives you great-looking badges while saving ink and keeping your line moving. If you’re printing VIP badges or need extra-special quality, you can switch to Quality mode.

Avoid using Max Speed or Max Quality as these extreme settings are not ideal for typical event badges and can compromise overall results.
5.4 Adjusting the Cut Position
Sometimes the printer might cut above or below where you want it to. This is easy to fix!
- Print a test badge and look at where it is cut
- If the cut is too high (above the badge), enter -5 in the cut position setting
- If the cut is too low (into the badge), enter +5
- Test again and keep adjusting by 5 until it’s perfect
Pro Tip: Write down the final cut position setting for your printer; it’ll save you time at future events!
5.5 The Epson printer prints an additional blank badge with each print
Although uncommon, the Epson printer may occasionally produce a blank badge along with the correctly printed badge, as if it is “double-printing.” This means that after one badge feeds through to print, it does not immediately cut at the seam as intended. Instead, a second blank badge follows up before finally cutting.
This is caused by a miscalibration of the badge stock and can be resolved through the following methods:
- Recalibrate the badges as shown in 3.2 Calibrating the Printer Manually.
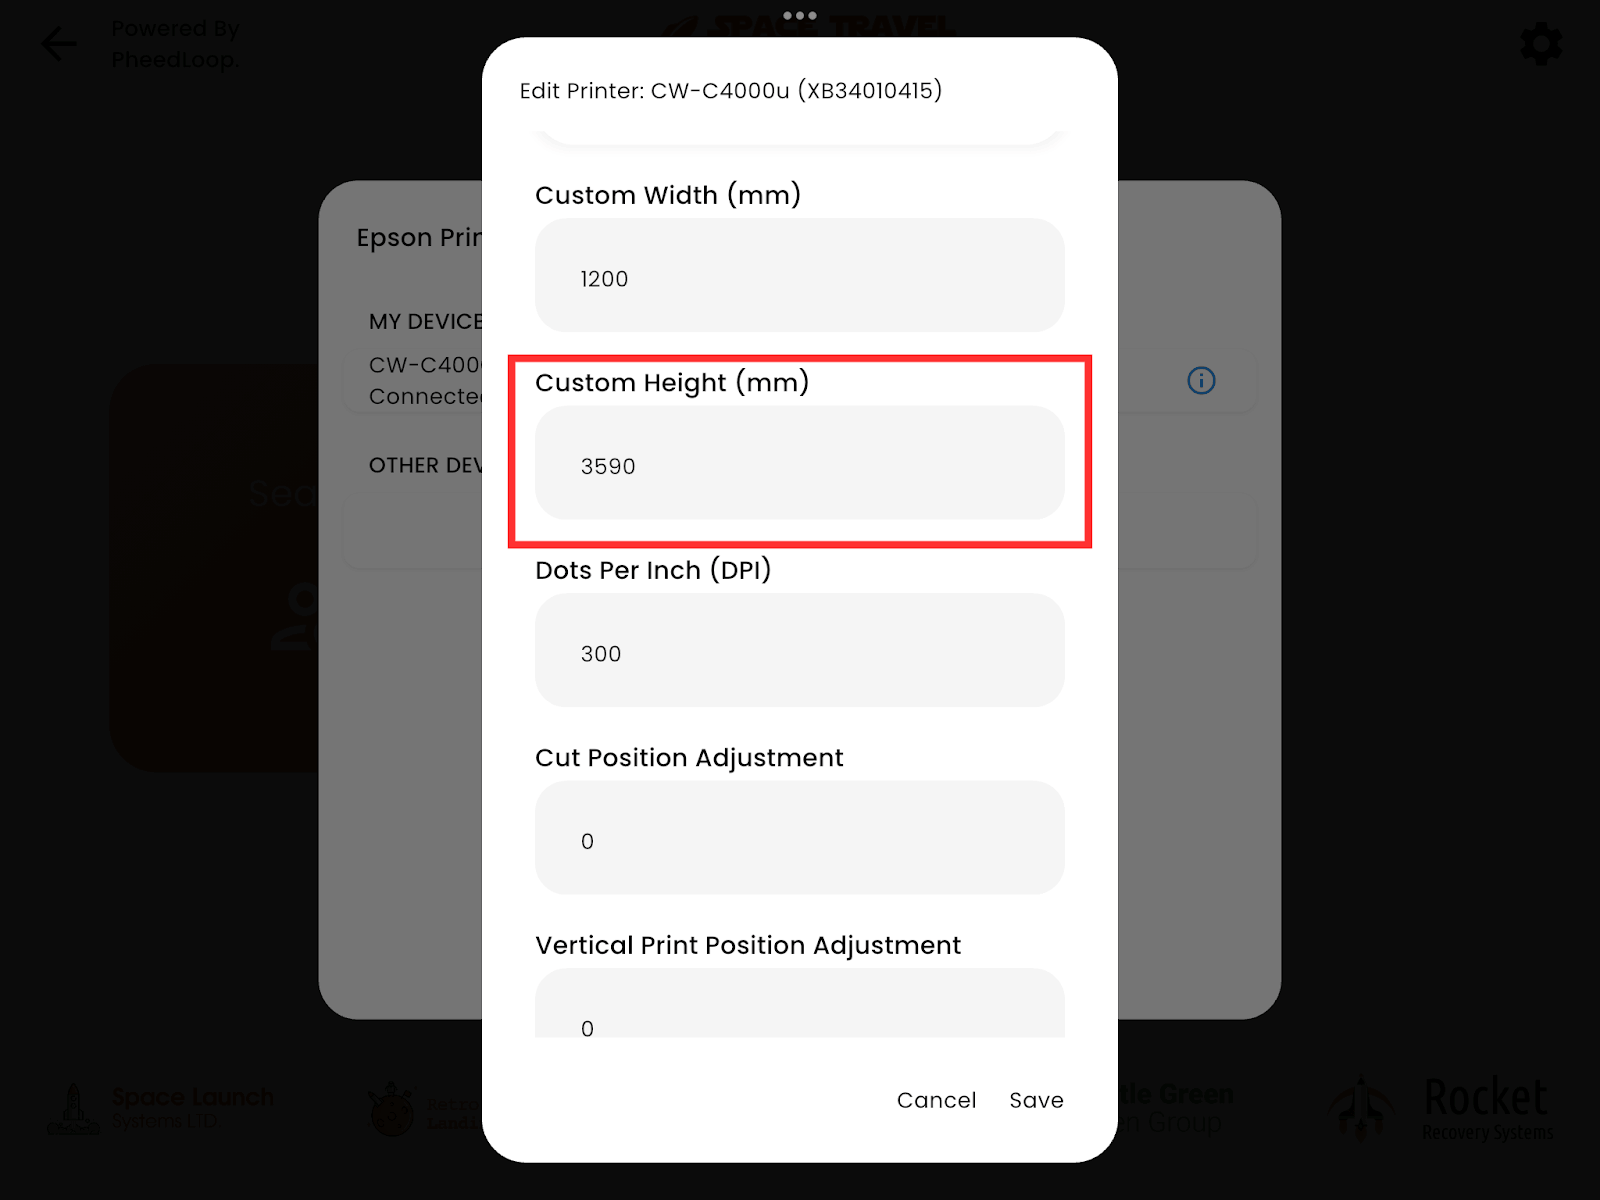
-
In PheedLoop Onsite, review the print and cut position settings. They may need to be tweaked or reset to default to resolve the issue. Access the printing settings on PheedLoop OnSite and change the Custom Height (mm) from 3600 to 3590.
- If the double-printing still persists, attempt to swap the badge stock to a different printer. This isolates the issue to either the individual badge stock or the printer’s individual settings.
- If the double-printing is gone on a new printer, that likely confirms the old printer’s settings are the root of the issue and requires a closer inspection. If the double-printing persists, this likely confirms a fault in the individual badge stock as a whole.

If the badge stock is the issue, you may require the assistance of PheedLoop Logistics. Please contact us at logistics@pheedloop.com, and we will look into this for you right away.
6. Frequently Asked Questions
Here are answers to questions we hear most often from customers using Epson printers.
6.1 How can I troubleshoot the Epson printers?
For instructions on how to troubleshoot, please refer to our Epson printer Not Working? Step-by-Step Help article. This article covers troubleshooting issues, including:
- Why is printing taking so long?
- The printer is feeding multiple badges at once. What do I do?
6.2 Can I connect multiple printers to one iPad?
Absolutely! This is great for high-volume events. Just follow the same connection process for each printer. They’ll all appear in your “My Devices” list, and you can choose which one to use for each print job.
6.3 How do I know when to change the ink?
The printer’s display shows real-time ink levels. As a rule of thumb, if any color is below 25%, consider replacing it before a big event to avoid running out mid-event. It’s always better to swap cartridges proactively than to scramble during your event!
7. Getting Help
We’re here to support you every step of the way. Here’s how to get help when you need it.
7.1 Before Your Event
We strongly recommend doing a test run before your event. Set up your printer, connect it to PheedLoop OnSite, and print a few test badges. This helps you:
- Get familiar with the setup process
- Identify any issues ahead of time
- Adjust settings like cut position
- Check that your badge design looks great when printed
7.2 Contact Support
Need assistance? We’re here to help! For urgent event support, contact our Logistics department at logistics@pheedloop.com. If you are using our live support, feel free to contact us with the provided number, and a member of the Logistics department will respond shortly.
7.3 Managing Returns
Your logistics support representative will walk you through the return process extensively. Please ensure the return labels are affixed to the boxes.
There are three primary methods for returning your kiosks:
- Fill out Kiosk Pickup Request Form. Once this form is complete, the staff at PheedLoop will arrange shipping with UPS according to your desired address.
- Drop the kiosk off at a physical UPS store. The UPS staff there will arrange the shipment themselves.
- If your venue has a partnership with UPS, you can leave the boxes with them for shipping.
If you have any questions, please reach out to logistics@pheedloop.com, and a member will answer your inquiry.
8. Ready to Print!
You’re all set to create beautiful, professional badges for your events! We’re excited to see how Epson printing enhances your attendee experience.
Remember:
- Test before your event
- Keep an eye on ink levels
- Have backup badge stock on hand
- Reach out if you need help
Thank you for being part of the PheedLoop community. We’re constantly working to improve our platform, and your feedback helps us build better tools for creating amazing event experiences.