Customizing Your Check-In Experience with Kiosk Profiles
Kiosk Profiles let you create and configure different check-in experiences for each iPad independently. Each profile controls the visual design of the kiosk — the splash screen background, color scheme, and sponsors — as well as the check-in behavior settings, such as whether attendees can scan a QR code, reprint their badge, or edit their profile.
Because profiles are assigned per iPad in the OnSite app, individual iPads at the same event can run different check-in flows. A dedicated exhibitor lane, a VIP entrance, and a general registration desk can each have their own profile without any manual reconfiguration on event day.
This article covers creating and configuring a Kiosk Profile in the Dashboard, and connecting a profile to an iPad in the OnSite app.
Contents
- Creating a Kiosk Profile
- User Interface Settings
- Badge Printing Settings
- Check-in Behavior Settings
- Sponsor Settings
- Configuration
- Content and Forms
- Exclusion Settings
- Visual Customization
- Connecting a Profile in the OnSite App
Step 1 — Create a Kiosk Profile
- From the Event Dashboard, navigate to OnSite > Kiosks
- Above the profiles table, select Create
- Under Basic Details, enter a Name for the profile — use something that identifies the check-in flow (e.g., General Attendee, Exhibitor Lane, VIP). This name is only visible to your team
- Configure the remaining settings (covered in Steps 2–9 below), then select Save Changes
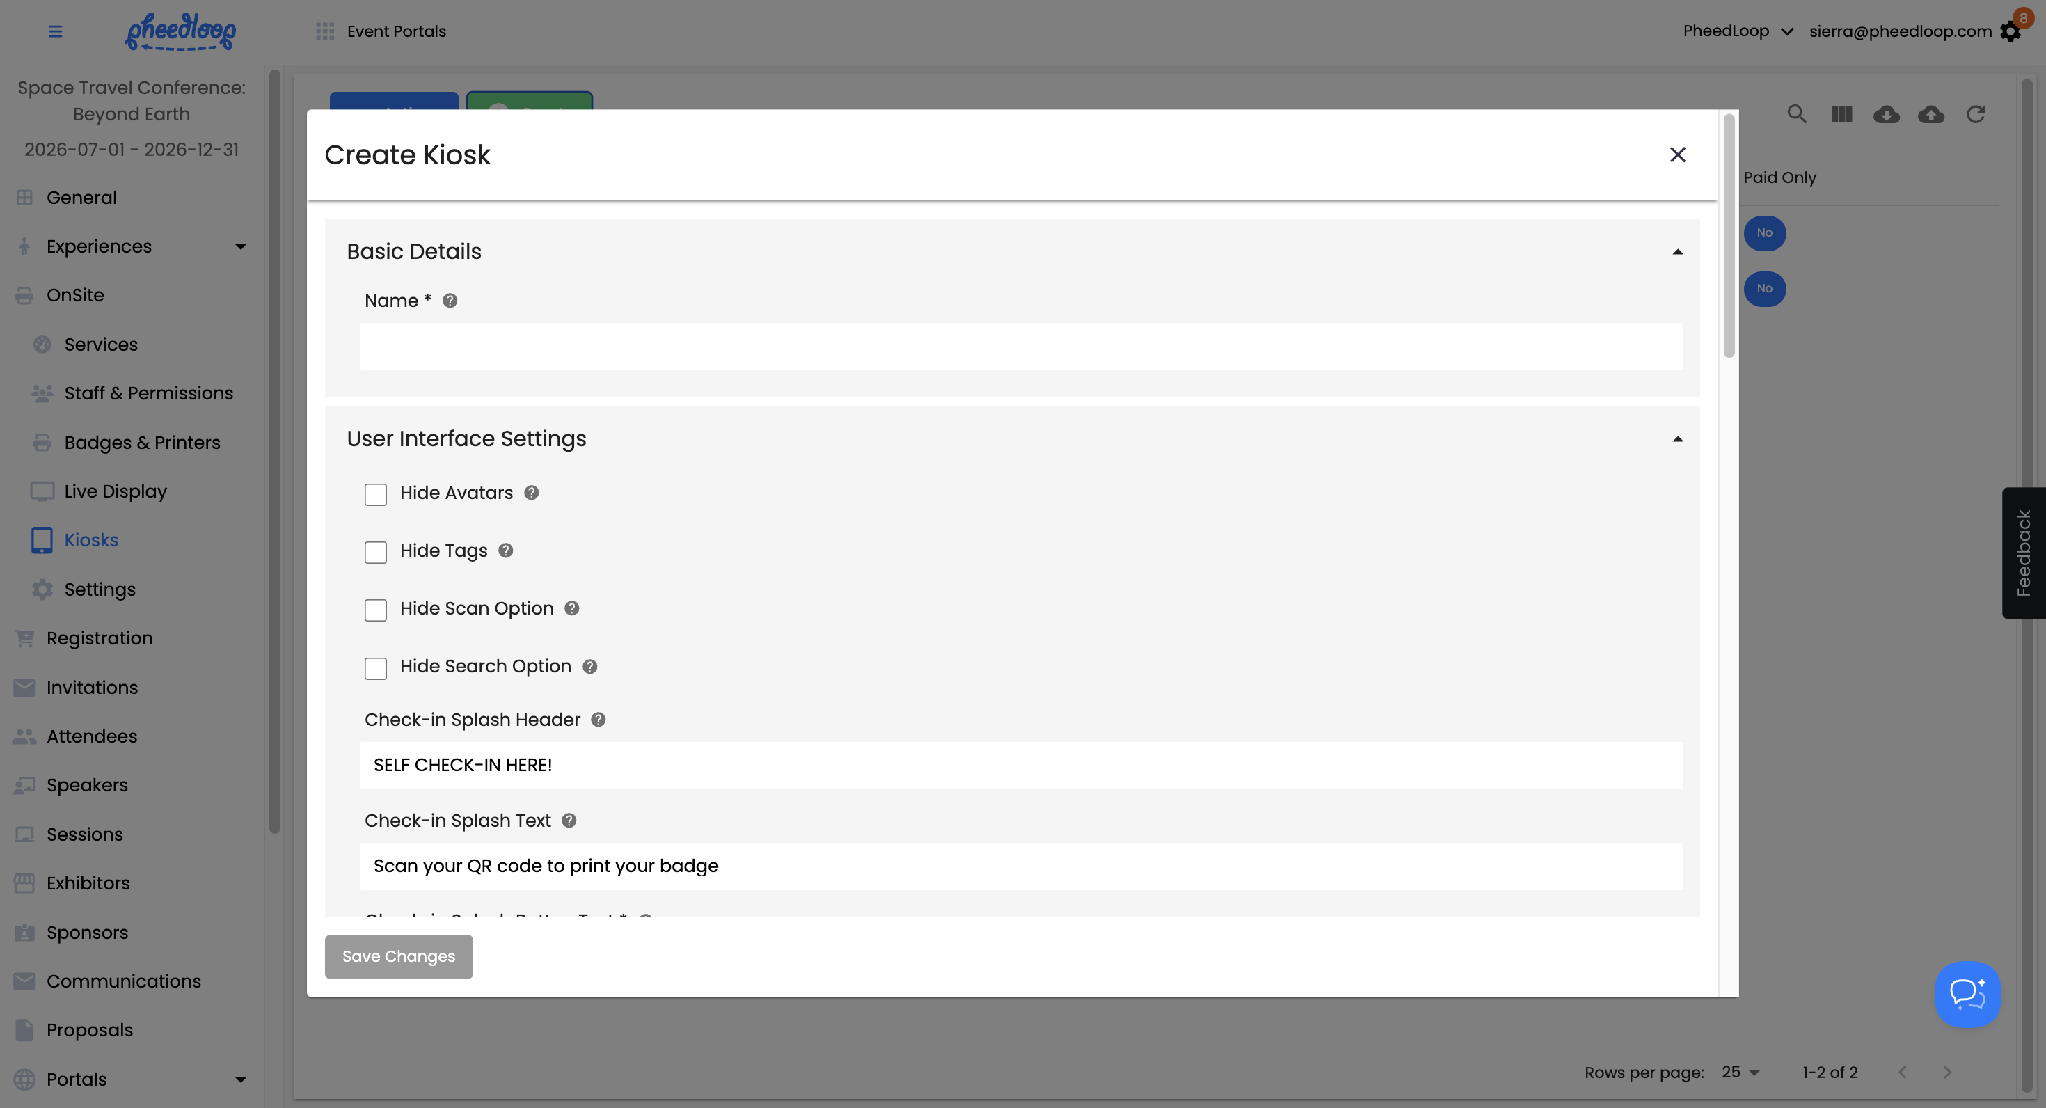
Step 2 — User Interface Settings
These settings control what attendees see and interact with on the check-in screen after tapping to start.
| Hide Avatars | Removes attendee profile photos from search results at the kiosk |
| Hide Tags | Removes attendee tags from search results at the kiosk |
| Hide Scan Option | Removes the Scan QR Code button from the check-in screen. Attendees must search by name, email, or organization instead |
| Hide Search Option | Removes the Search button from the check-in screen. Attendees must scan a QR code instead |
| Check-in Splash Header | The large heading text displayed on the splash screen |
| Check-in Splash Text | The subheading text below the splash header |
| Check-in Splash Button Text | The label on the button attendees tap to start check-in |
Step 3 — Badge Printing Settings
| Disable Badge Printing | Turns off badge printing at this kiosk. Use for check-in-only lanes where no printer is connected |
| Allow Badge Reprints | Lets attendees reprint their badge after they have already checked in |
Step 4 — Check-in Behavior Settings
| Allow Profile Edits | Lets attendees edit their profile information at the kiosk before printing their badge |
| Skip Badge Preview | Skips the badge preview step and prints immediately upon confirming check-in |
| Skip Splash Screen | Bypasses the splash screen entirely — attendees go straight to the check-in options (search, scan) when the kiosk is idle |
| Restrict to Paid Attendees | Prevents attendees with unpaid registrations from checking in |
| Allow Organization Members | Lets organization members check in even if they are not registered attendees |
Step 5 — Sponsor Settings
Sponsor logos appear as a rotating carousel at the bottom of the kiosk splash screen.
| Sponsor Carousel Mode | Controls which sponsors appear in the carousel. Set to All Sponsors to show every sponsor with a logo uploaded, or select specific sponsors using the field below |
| Sponsor Carousel Sponsors | When Sponsor Carousel Mode is not set to All Sponsors, use this field to select which specific sponsors should appear on this profile's carousel |
Before a sponsor appears in the carousel, they need a logo uploaded in the Dashboard:
- Navigate to Sponsors > Sponsors and select the sponsor
- Scroll to Design, then under Logo, select Choose File and upload the logo
- Select Save Changes
To exclude a sponsor from all carousels, toggle off Show in Event Carousels on their record.
Step 6 — Configuration
| Idle Timeout (seconds) | How long the kiosk waits after inactivity before returning to the splash screen. Default is 60 seconds |
| Color Scheme | The primary color applied across the kiosk interface — buttons, icons, and interactive elements. Enter as a hex code or use the color picker |
Step 7 — Content and Forms
| Check-in Information | Text displayed to attendees when they select the Check-in Information button during check-in. The Check-In Information button only appears if text has been added in the Dashboard |
| Check-in Form | A custom form attendees must complete before their check-in is finalized. Select from forms already created in the Dashboard |
Step 8 — Exclusion Settings
| Exclude Tags | Attendees with the selected tags will not appear in kiosk search results |
| Exclude Tickets | Attendees with the selected ticket types will not appear in kiosk search results |
Step 9 — Visual Customization
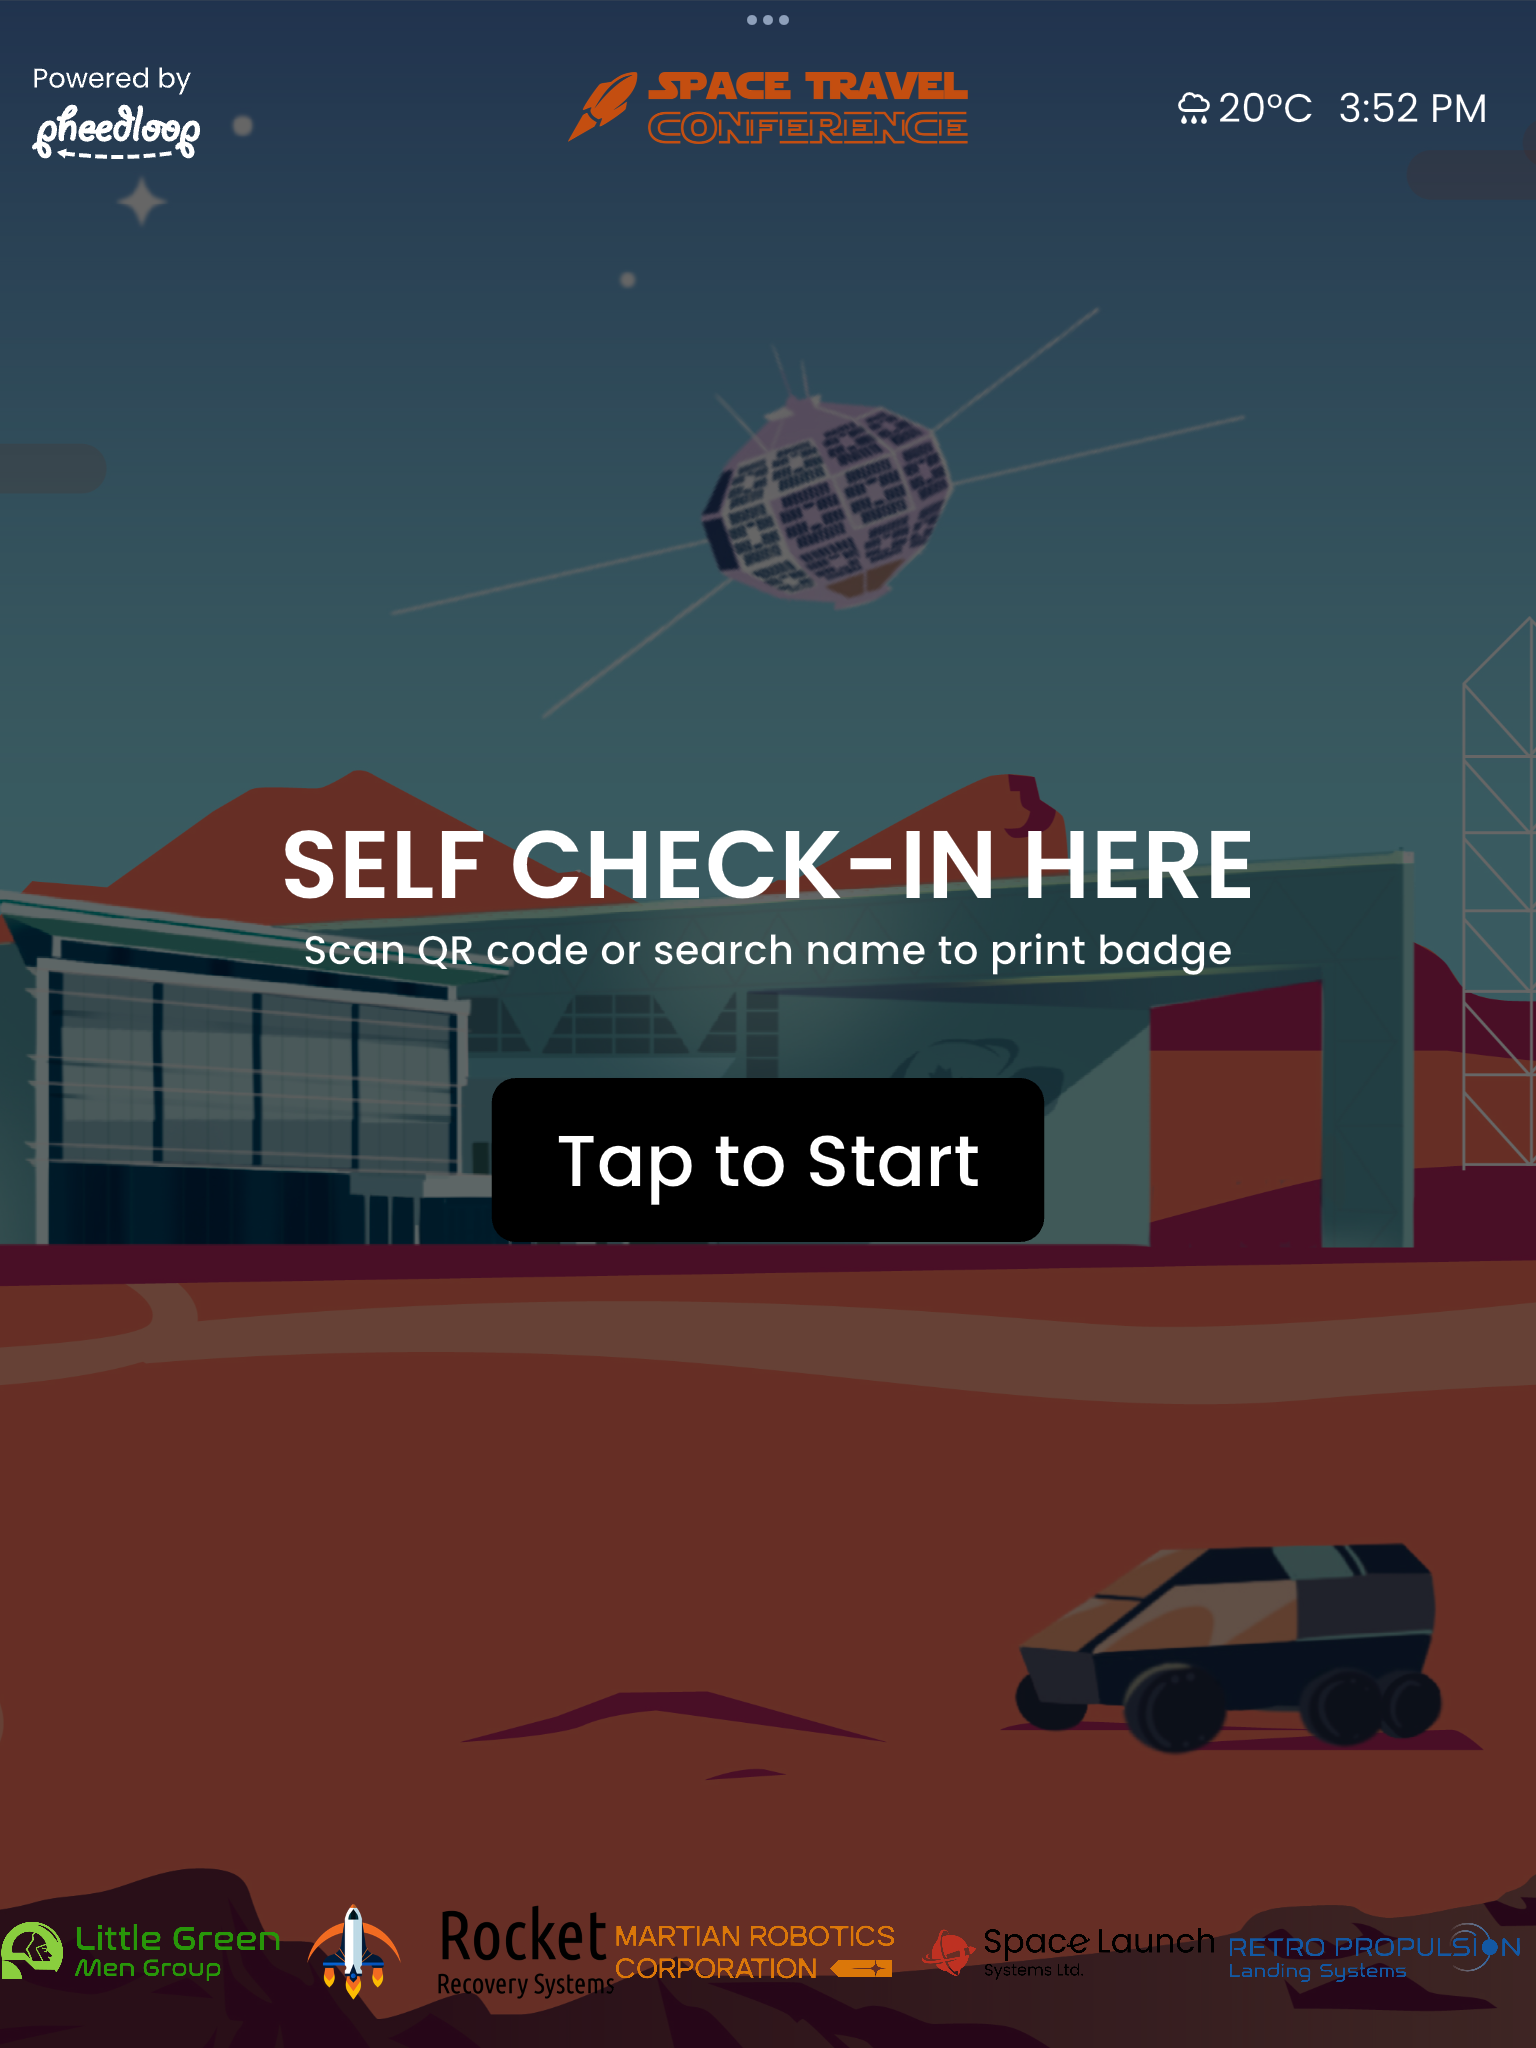
These settings control the images displayed on the kiosk splash screen. The splash screen is the first thing attendees see when they approach the kiosk — it shows your header text, subtext, start button, and sponsor carousel over your background image.
| Splash Screen Background Image (Landscape) | The full-screen background image for iPads in landscape orientation |
| Splash Screen Background Image (Portrait) | The full-screen background image for iPads in portrait orientation |
| Page Header Banner Image | A banner image displayed at the top of the check-in pages. If no banner is uploaded, the Event Logo is used instead |
Step 10 — Connect a Profile in the OnSite App
Profiles are assigned to each iPad directly in the OnSite app. Each iPad connects to one profile at a time.
- Open PheedLoop OnSite on the iPad
- Select Check-In
- Under Setup, select Kiosk
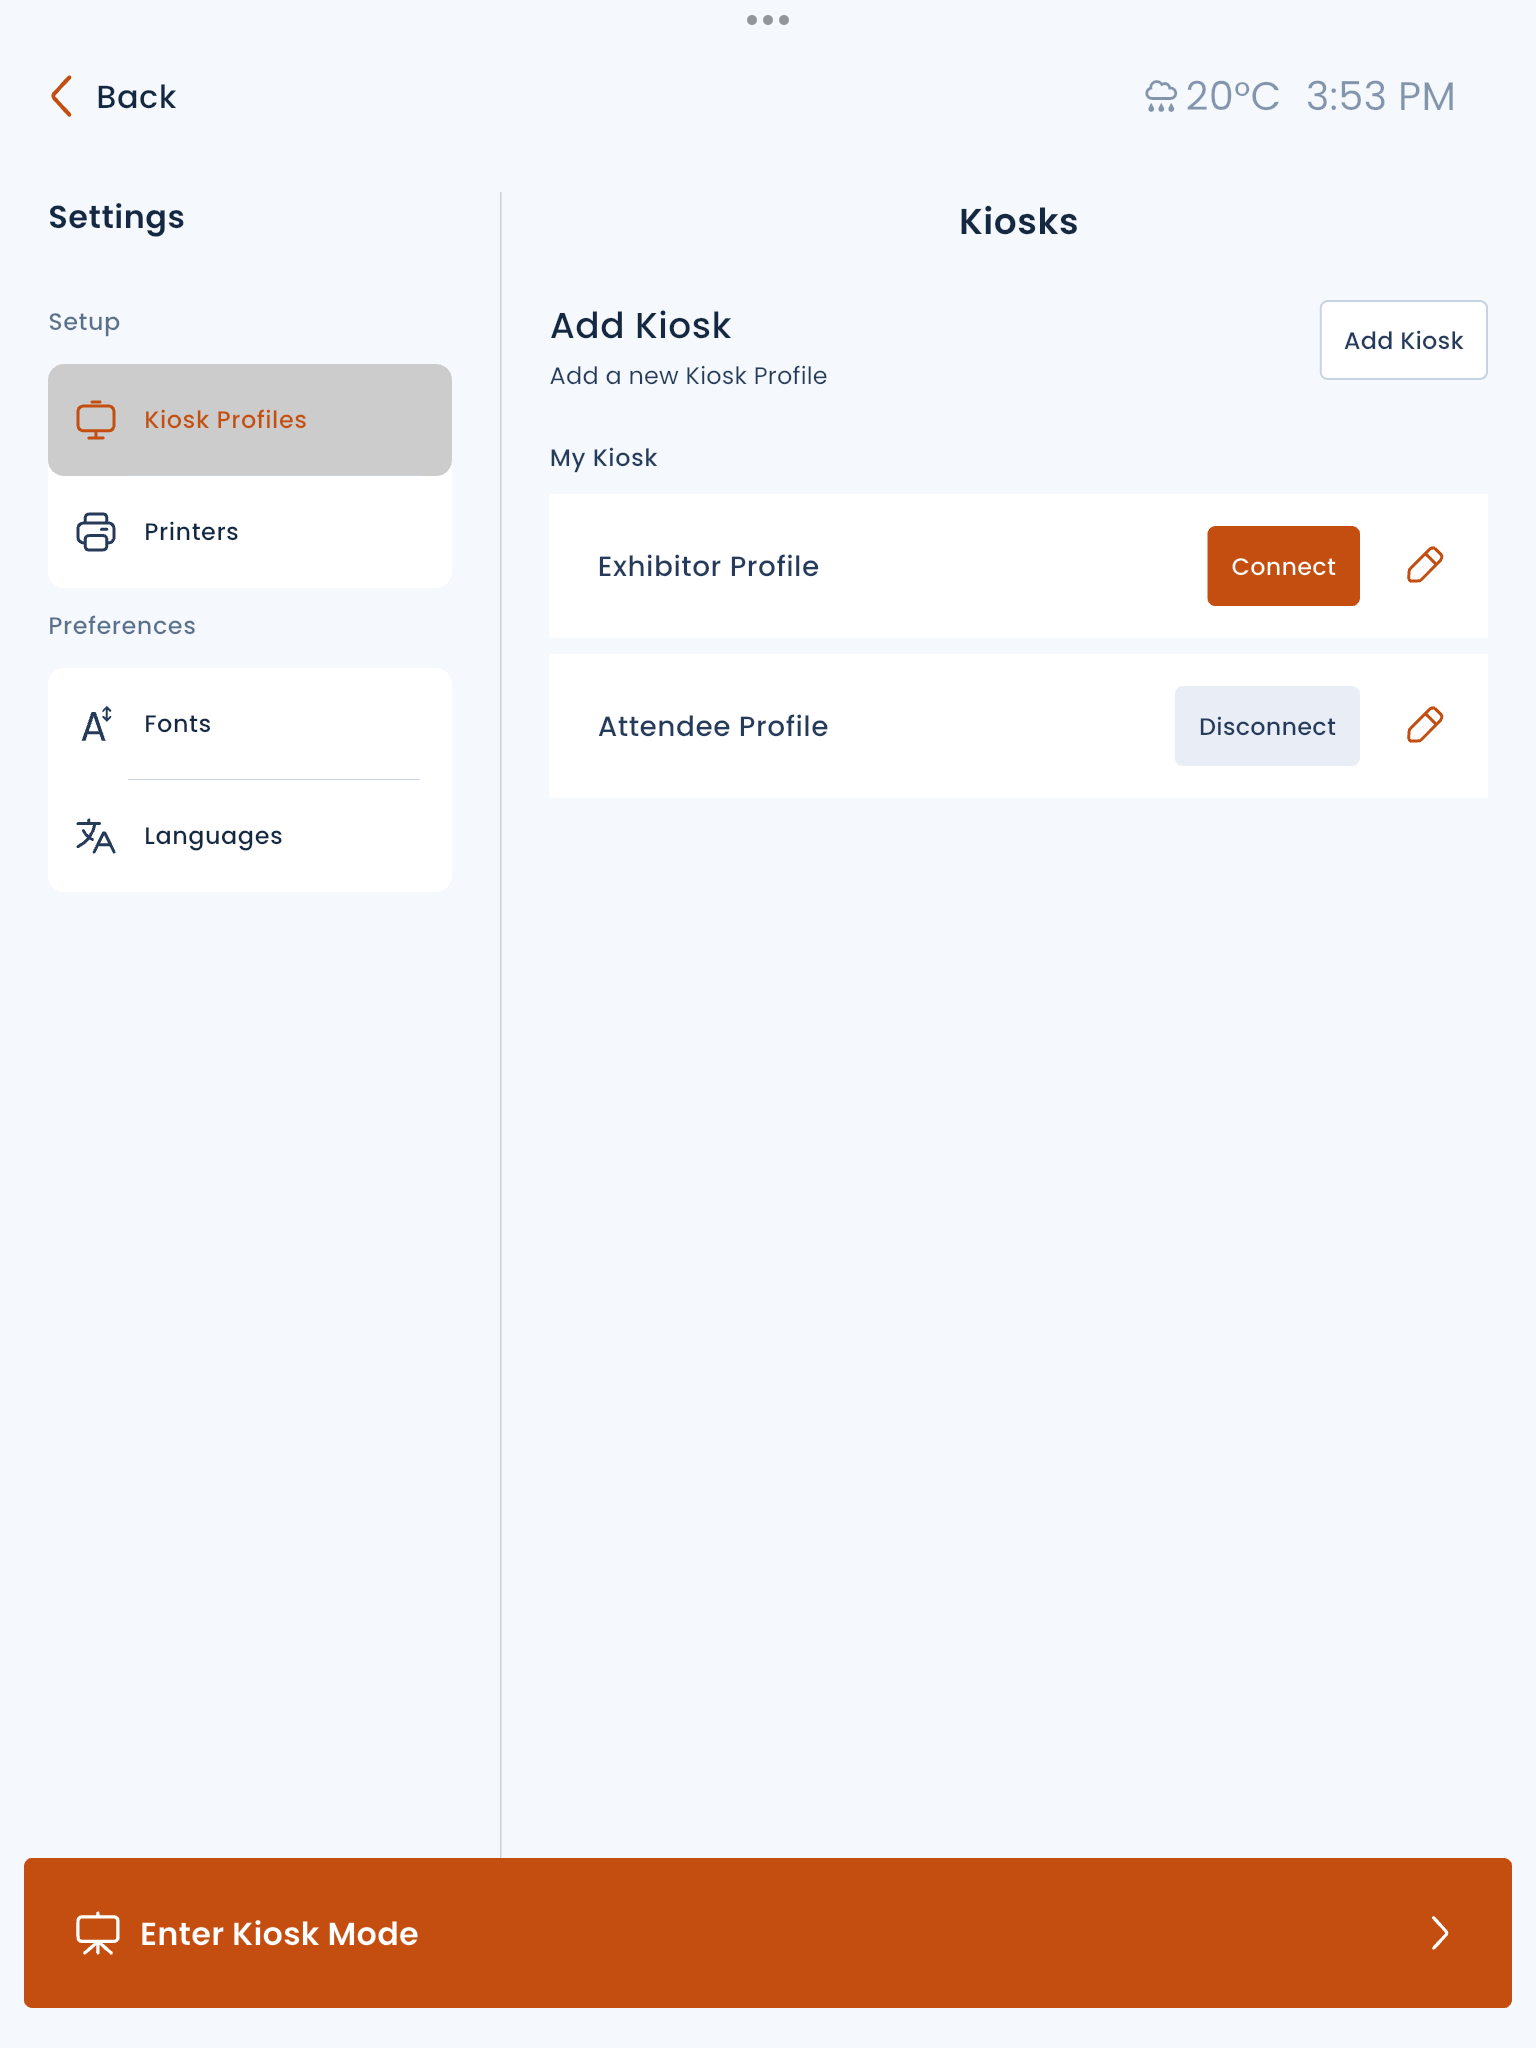
- Your event's kiosk profiles are listed under My Kiosk. Select Connect next to the profile you want this iPad to use
- Select Enter Kiosk Mode at the bottom of the screen to launch the kiosk experience
The iPad will display the splash screen configured in that profile. To switch profiles or exit Kiosk Mode, select Powered by PheedLoop in the top left corner.
To edit a profile's settings from the app, select the pencil icon next to the profile name. Changes save back to the Dashboard.
Quick Tips
- Edit your default profile first — this is the fallback for any iPad that does not have a specific profile connected. Then build additional profiles for specialized lanes
- Upload both a landscape and portrait background image if your iPads may be used in either orientation. The kiosk will automatically use the appropriate image
- The Idle Timeout setting affects how quickly the splash screen returns after an attendee walks away. A shorter timeout keeps the kiosk ready at busy entrances; a longer timeout suits quieter lanes
For setting up the physical iPads and printers, see Setting Up Your Zebra Kiosk or Setting Up Your Epson Kiosk.
For running check-in on event day, see Running Check-In on Event Day.